
Cluster Maintenance
Intro
This post teaches you how to monitor the cluster’s health, manage cluster resources, and perform ongoing maintenance and troubleshooting to keep the cluster in top working order.
Monitor and Manage the Cluster
Monitor the Cluster
Monitoring Tools
Tools
The Cluster can be monitored using MapR tools like MCS, CLI and external tools like Ganglia and Nagios.
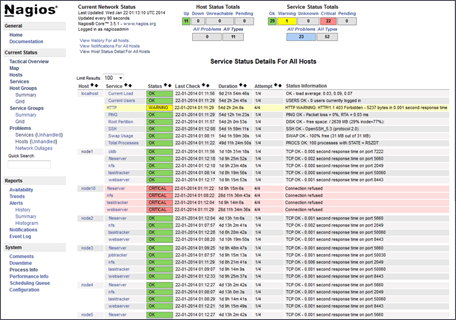
Nagios
- Nagios can monitor network and host resources
- Configuration script generator
- Conduit for alarms to go through standard escalation
- Integrates other sources of alarms aside from MapR builtin alarms.
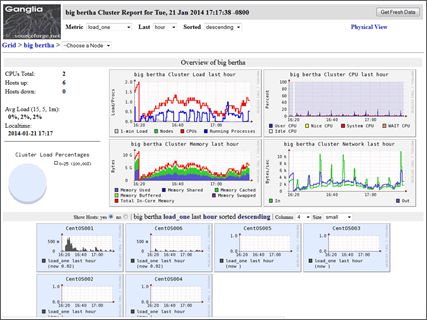
Ganglia
- Monitors Clusters and grids
- Scalable, distributed system monitoring tool
- Unlike Nagios, Ganglia is not used to raise alarms but to report cluster health.
- Show cluster status in a given time period
- Install on CLDB nodes to gather metrics from CLDB like cpu, memory, active server nodes and volumes created on the node and overall cluster.
Maintenance Tasks
- Overview
- Regular maintenance
- Replace disk(s)
- Maintain nodes
- Upgrade software
- Clean out log files
- Design changes
- Make cluster HA
- Expand cluster
- Balance services
- Regular maintenance
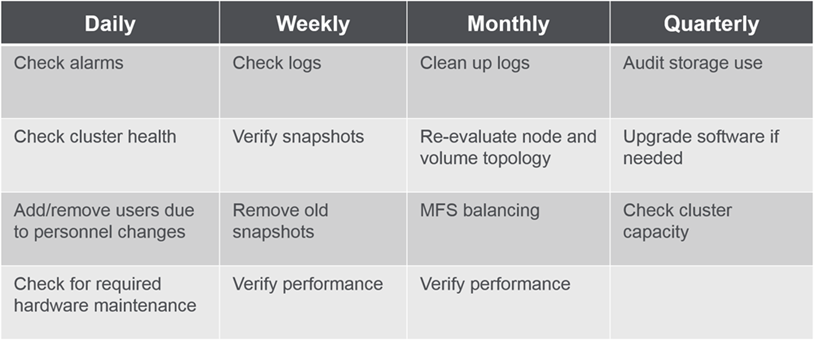
- Sample Schedule
Shown here is a possible Monitoring and Maintenance Schedule :
Configure and Respond to Alarms
MapR Alarms
About Alarms
- Alarms are raised to notify users of a problem
- When an alarm is raised alerts are posted to the MCS
- Can also be sent via email
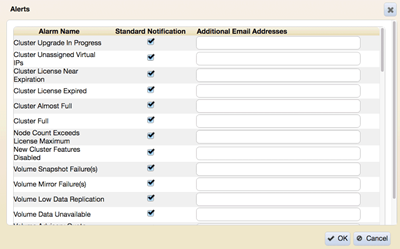
- Configure custom email addresses for specific alerts to accountable entities.
Alarm Classifications
Alarms can be classified into :
- Cluster Alarms :
- Cluster Space
- Licensing Issues
- CLDB problems.
- Volume Alarms :
- Specific to a Volume.
- Snapshots and Mirroring failures
- Under replicated and Unavailable data
- Volume topology problem.
- Node Alarms :
- Specific to a Node
- Disk failures
- Time-skew problems
- Failed Services
$ maprcli alarm names

View Alarms
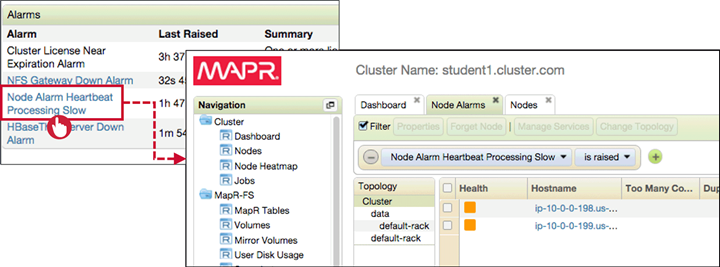
Alarms can be viewed either in Dashboard or MapR CLI. To see all alarms:
$ maprcli alarm list
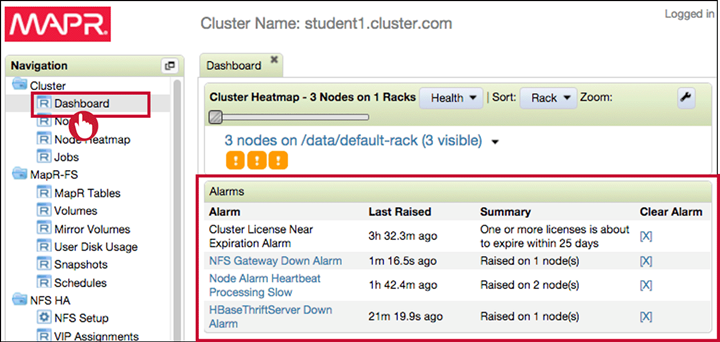
View Alarm Details
Vie alarm details in Dashboard and investigate the problems , restart services or nodes affected.
Configure Alerts
Overview
Before alarms are set configure SMTP and user email addresses.
-
Set up SMTP
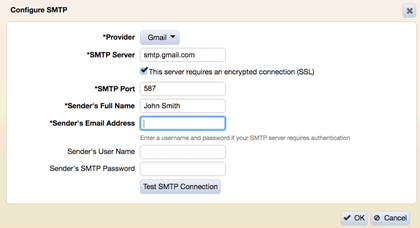
-
Configure email addresses of cluster users
-
Set up custom alerts
MCS and CLI
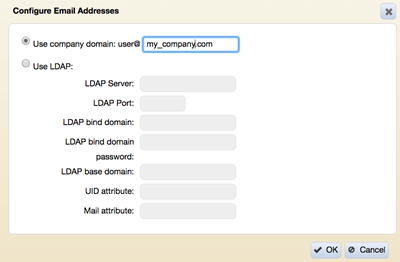
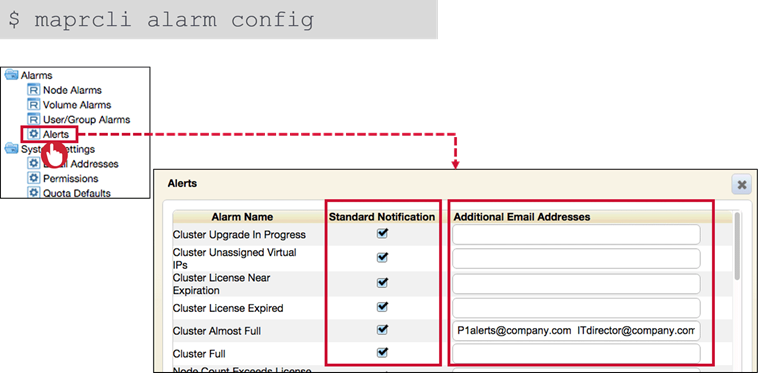 Standard alerts send email to the entity involved like Volume Quota Alarms to Volume Accountable Entity.
Additional address can be defined for alternative notifications to other target users.
Standard alerts send email to the entity involved like Volume Quota Alarms to Volume Accountable Entity.
Additional address can be defined for alternative notifications to other target users.
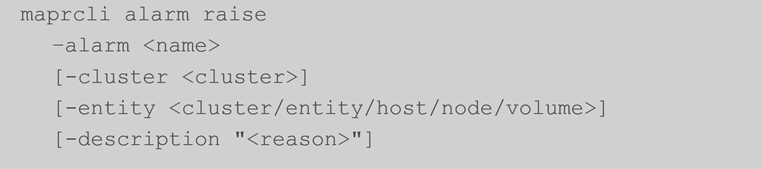
Test Alerts
It’s a good idea to test alarms because Email address and SMTP are not configured when alarms were defined.
- Raises the specified alarm
- Description appears in maprcli alarm list output and MCS
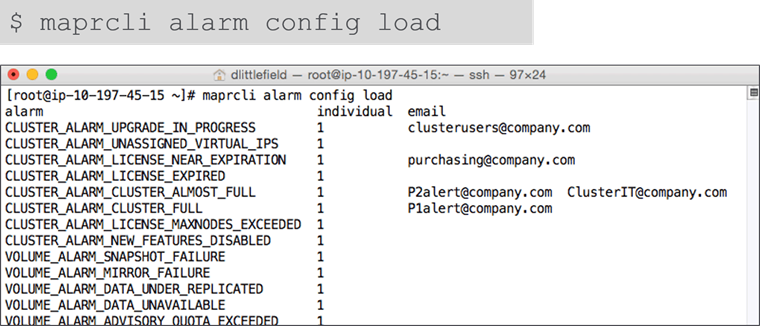
Verify Configuration
Respond to Alarms
Determine Urgency
- Alarms differ in urgency
- Some resolve on their own
- Some are early warnings
- Determine:
- Underlying cause
- What action is needed
- How soon action should be taken
- Many alarms are self-explanatory
- Refer to documentation for details
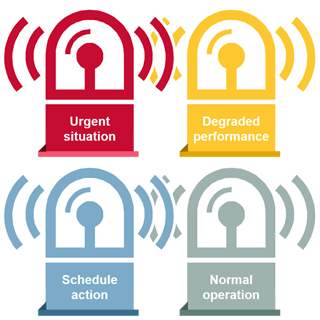
Example: Normal Operation
CLUSTER_ALARM_UPGRADE_IN_PROGRESS

- Normal operation
- Alarm will clear when upgrade is done
Example: Schedule Action
ALARM_ADVISORYQUOTA_EXCEEDED

- Urgency depends on:
- Rate of data growth
- Differential between advisory and hard quotas
- Which volume or AE
Example: Degraded Performance
NODE_ALARM_SERVICE_*_DOWN

- May impact a single node, or entire cluster
- Criticality varies by service
Example: Urgent Situation
NODE_ALARM_TIME_SKEW

- Alarm raised for time skew
- Maximum differential: 20 seconds
- Recommended differential: <500 ms
- System time critical for ZooKeeper functionality
- Use NTP
Balance Cluster Resources
As the cluster keeps growing and changing it is important to balance location and replication of data. There are two balancers available :
- Disk balancer
- Redistributes data
- Role balancer
- Changes container replication role
Balancing starts 30 minutes after CLDB startup, by default
- change with
cldb.balancer.startup.interval.sec
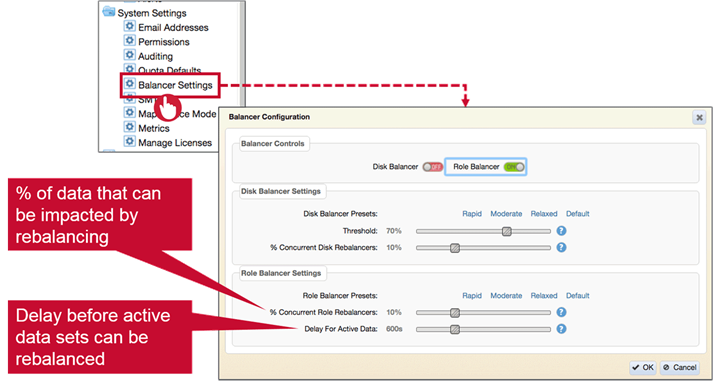
Disk and Role Balancers
Disk Balancer
- Moves containers between storage pools
- Ensures disk usage on nodes is similar
Disk balancer is particularly useful when new nodes or rack is added to matured cluster.
Disk Balancer Details
There are two primary disk balancer settings :
- Threshold defines a percentage of utilization at which a storage pool is eligible for rebalancing. Can be set between 10%-99%
- Concurrent disk rebalancers define percentage of data can be actively rebalanced at a point of time. This prevents rebalancing from disrupting normal cluster operations. Can be set from 2%-30%

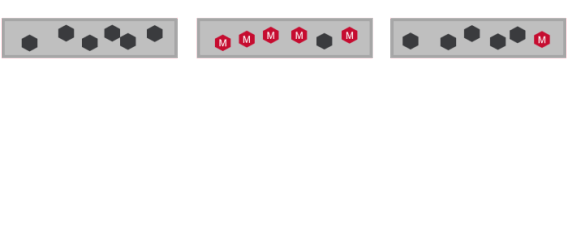
Role Balancer
- Changes replication roles of containers to ensure all nodes have equal share of master containers.
- Distributes master containers among nodes
- Evenly distributing replication roles balances network bandwidth and also spreads load for writes across cluster.
- Write operation on MapRFS and Read on MapRDB are performed on master container.So role balancing also distributes table reads.
Role Balancer Details
There are two primary role balancer settings
Enabling Balancers Through the CLI
Balancing: CLI
- Turn on:
maprcli config save -values {"<parameter>" : "<value>"} - Adjust:
maprcli config save -values { "cldb.balancer.disk.paused" : "0"} maprcli config save -values { "cldb.balancer.role.paused" : "0"} - Check values:
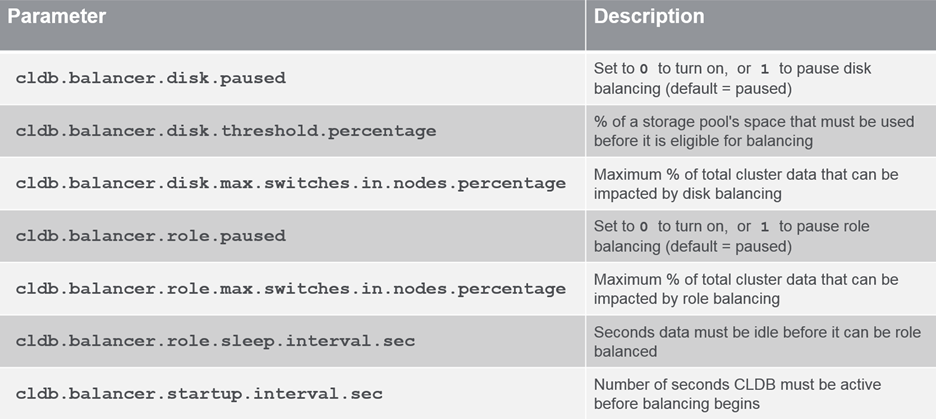
maprcli config load -json | grep balancerBalancer Parameters
List of some of the disk and role balancing parameters
Manage Logs and Snapshots
Manage Snapshots

- Scheduled snapshots expire automatically
- Manual snapshots must be deleted
- Check regularly (at least monthly)
- Use schedules if possible
Remove Snapshots
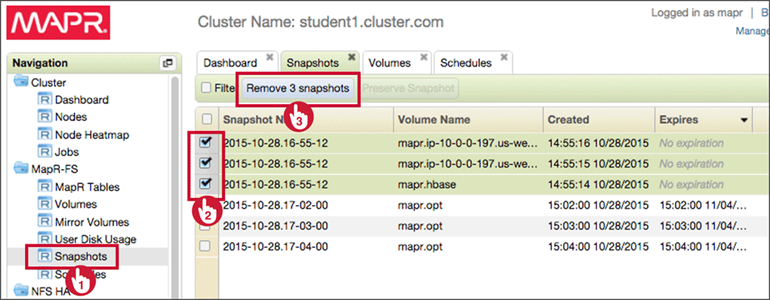
maprcli volume snapshot list -columns snapshotid -filter [expirytime=="0"]
maprcli volume snapshot remove -snapshots <ID1, ID2, ID3 ...>
Manage Log Files
- Overview
- Some managed automatically
- Job logs
- Data audit logs (if enabled)
- Others must be cleaned out manually
maprcliaudit logs- Cluster audit logs (if enabled)
- Some managed automatically
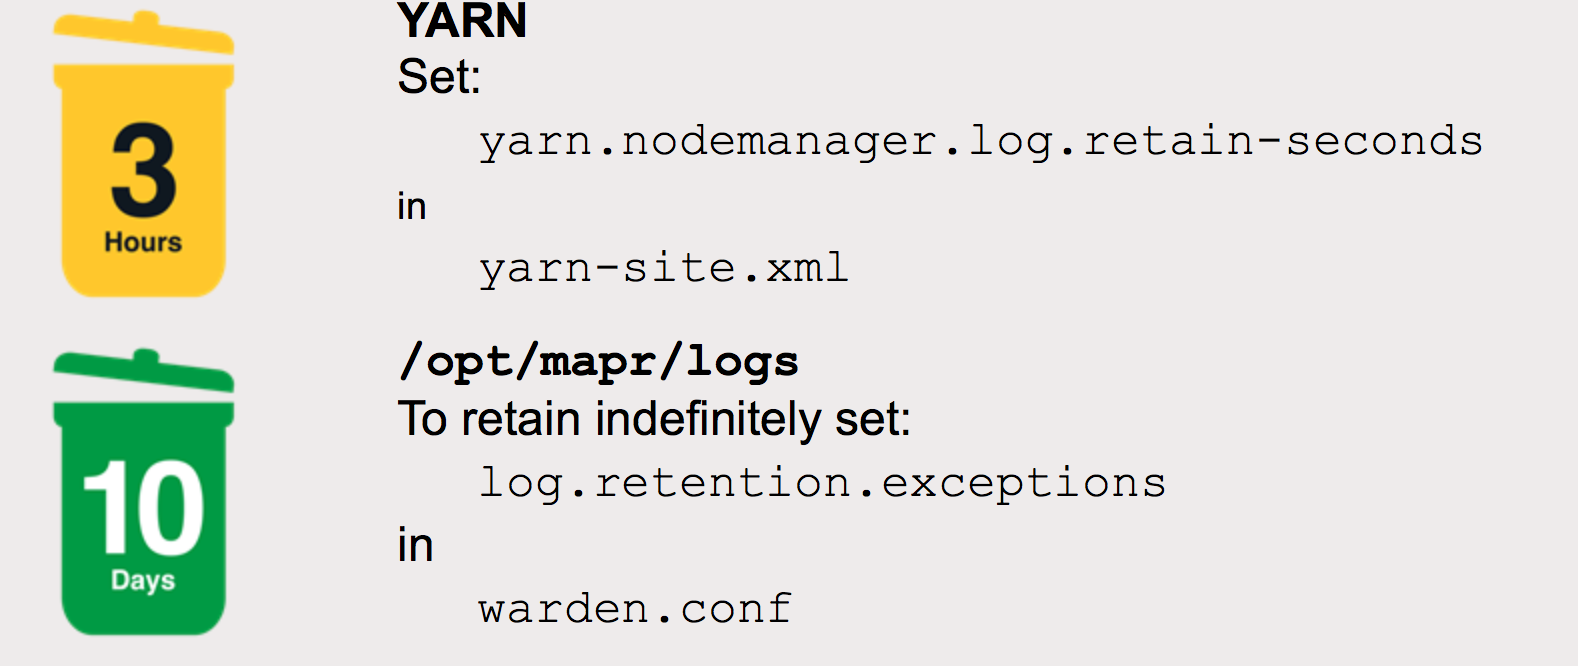
- Retention Times
- Retain longer if needed for troubleshooting
- example: job logs with local logging deleted after 3 hours by default
- Shorten retention time if logs get too large
- Retain longer if needed for troubleshooting
Add and Remove Services
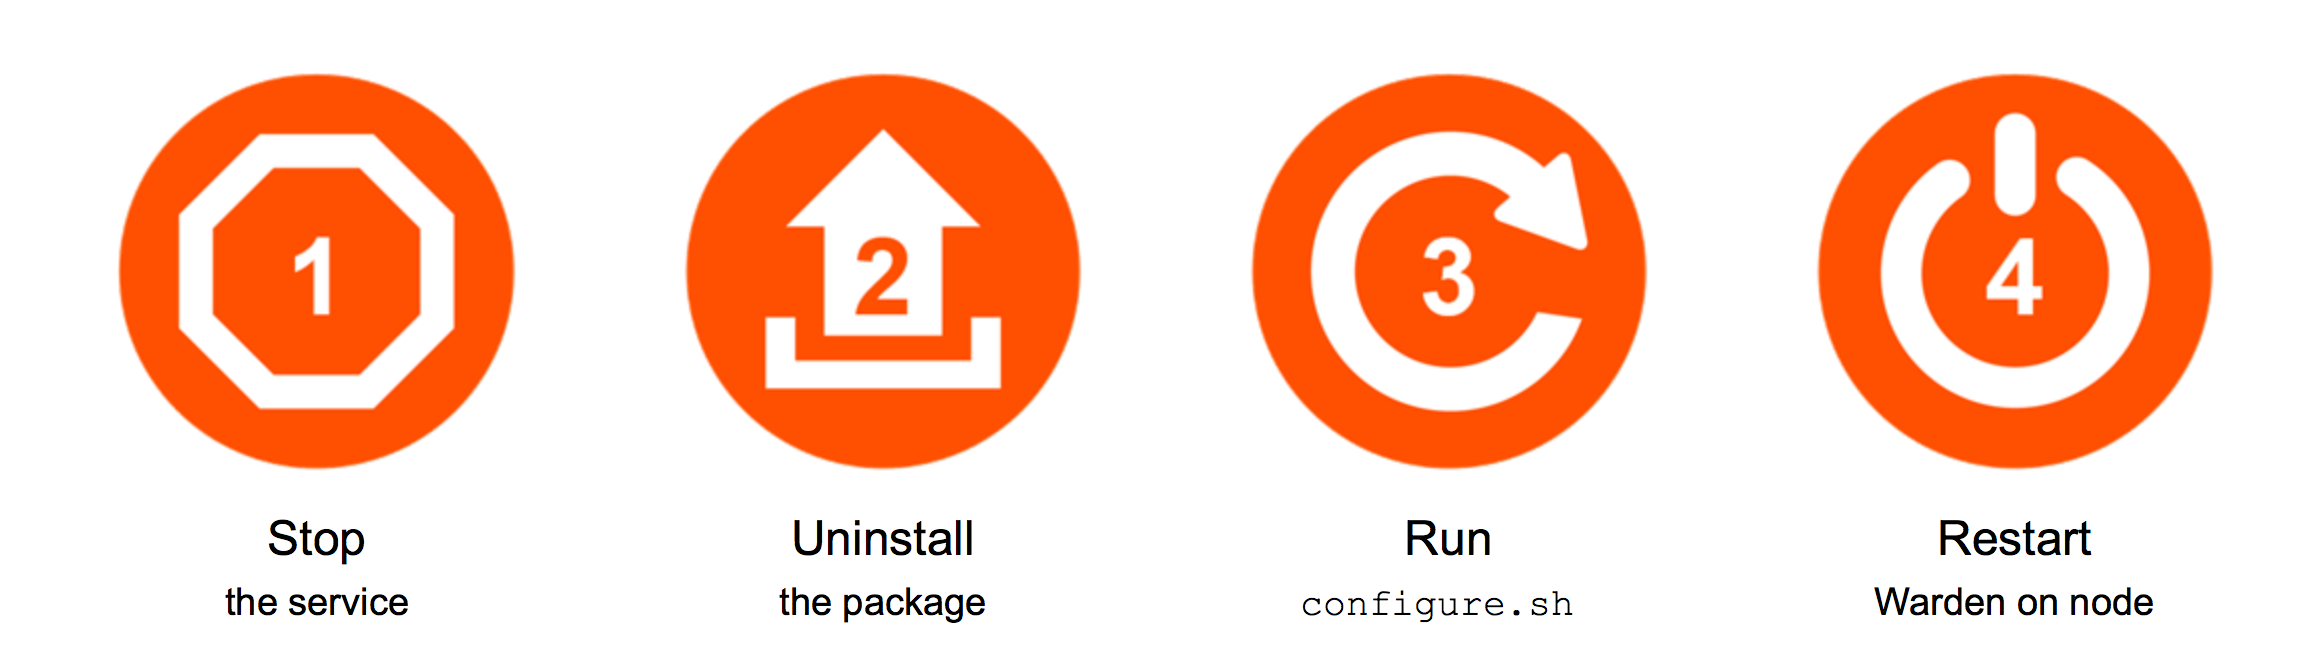
Removing Services
The following is the procedure for removing a service from a node.
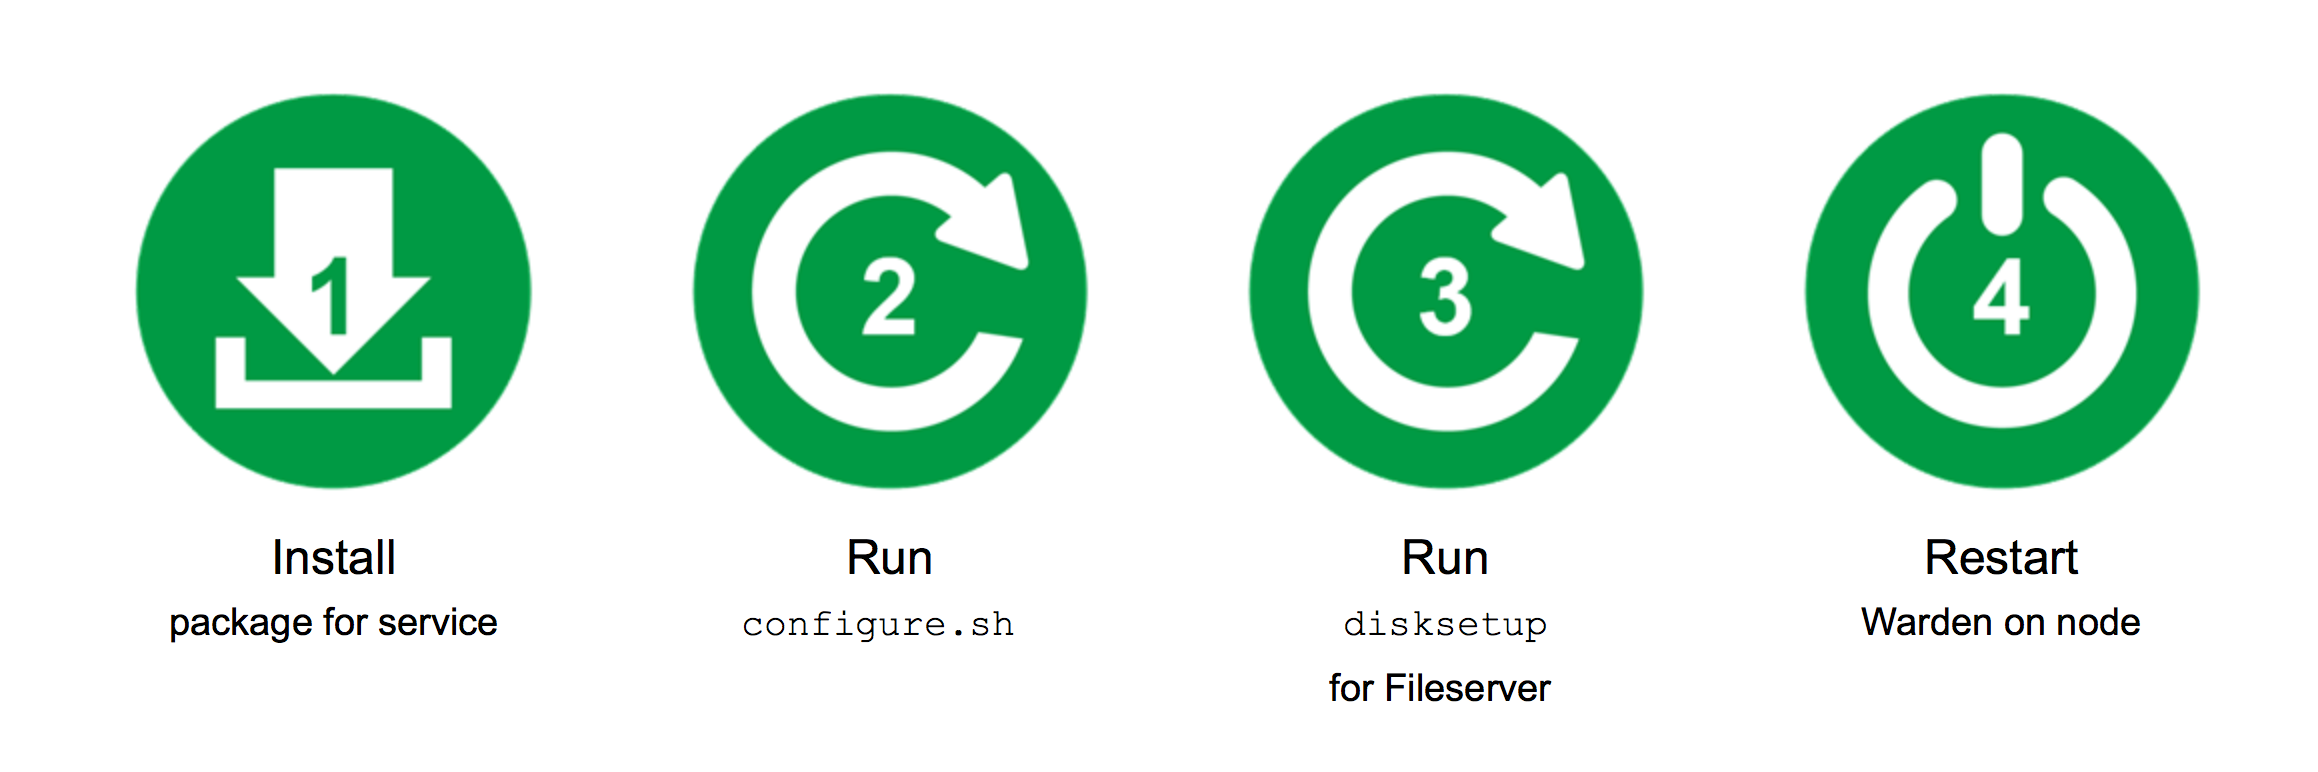
Adding services
Adding services is even easier than removing as follows :
Disk and Node Maintenance
Replace a Failed Disk
Disk Failure
Replacing failed disks is a normal part of cluster maintenance. Factors impacting disk failure rate:
- Number of Disks
- Disk Reliability
- Data Center Environment
What Happens When a Disk Fails?
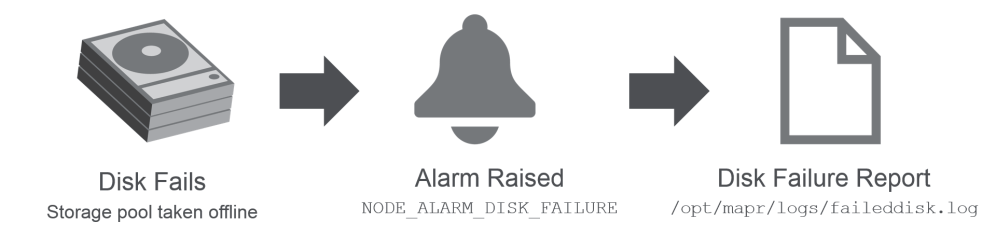
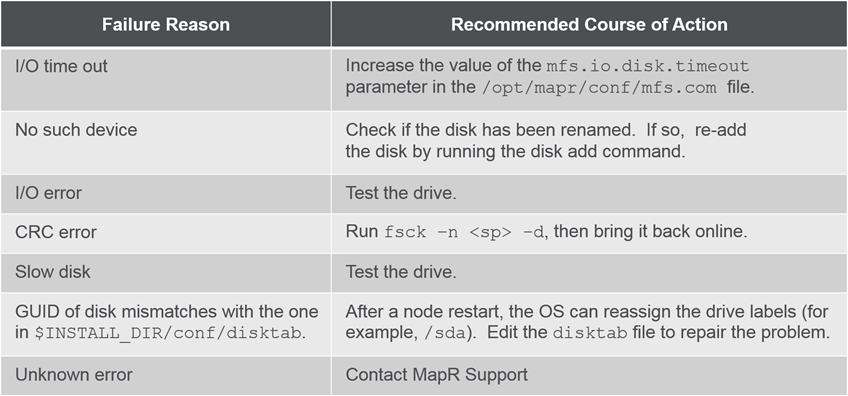
Disk Failure Information
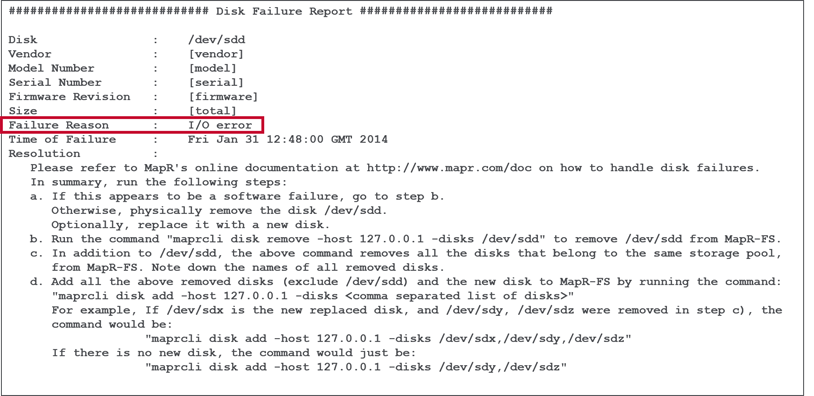
Look at the Disk Failure Report and perform recommeded recovery methods.
-
Disk Failure Report
-
Recovery Methods
-
Alarms Raised
- VOLUME_ALARM_DATA_UNDER_REPLICATED
- data under available disk is replicated but doesn’t meet minimum replication requirements.
- automatically re-replicated from another copy and alarm cleared
- VOLUME_ALARM_DATA_UNAVAILABLE
- If the only copy of data was on failed disk or all disks with that data failed.
- run
/opt/mapr/server/fsckto attempt to recover - Can bring storagepool online if
fsckclears disk issues. - risk of data loss
- VOLUME_ALARM_DATA_UNDER_REPLICATED
Caution : Risk of data loss when running fsck -r
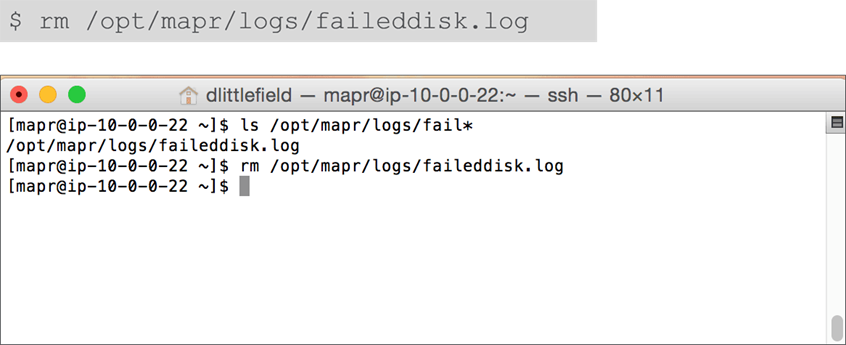
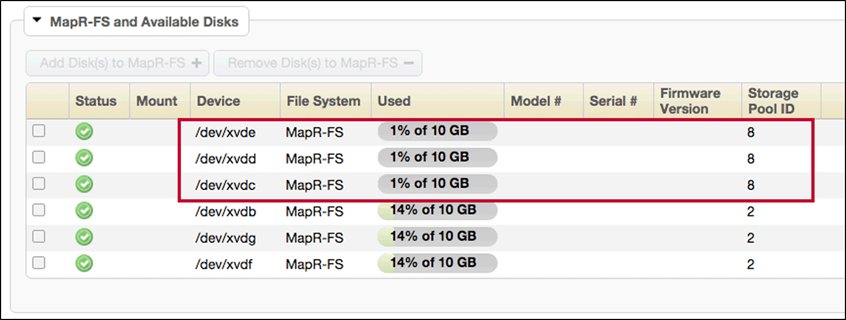
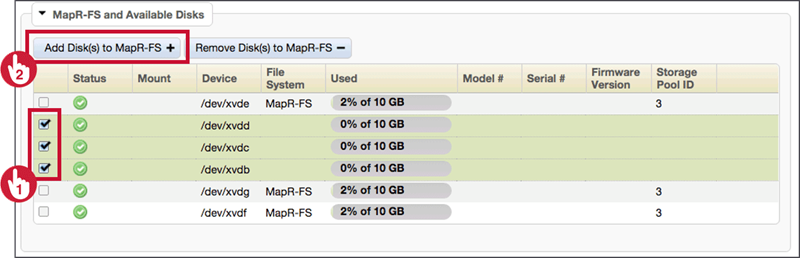
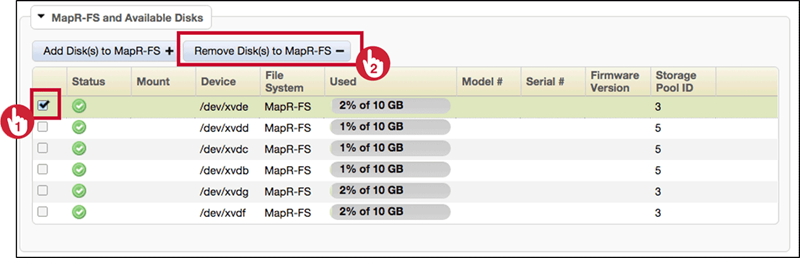
Replace a Failed Disk: MCS
To replace a failed disk in MCS navigate as follows :
-
Locate the Failed Disk
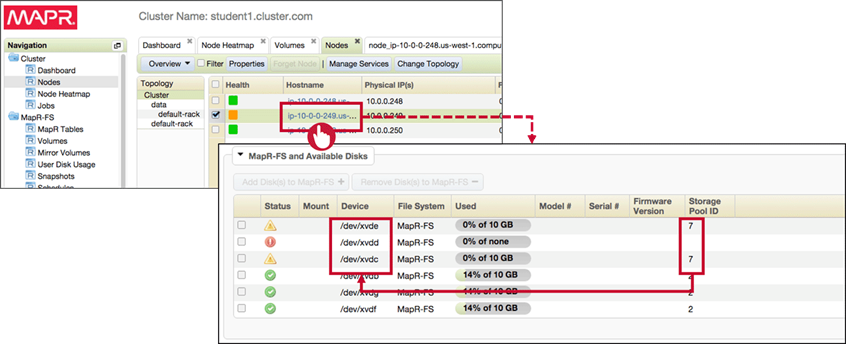
-
Remove the disk from MapR-FS and physically replace failed disk
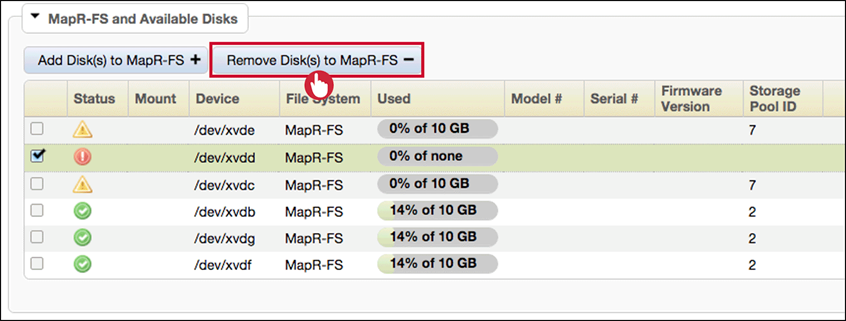
-
Add New/Repaired Disks
-
Remove the failed disk report when replacement is complete.
-
Verify New Storage Pool generated for new disks.
Replace a Failed Disk: CLI
To replace a failed disk in CLI perform following commands :
- Run
$ maprcli disk remove
- Note drives removed; physically replace failed drive
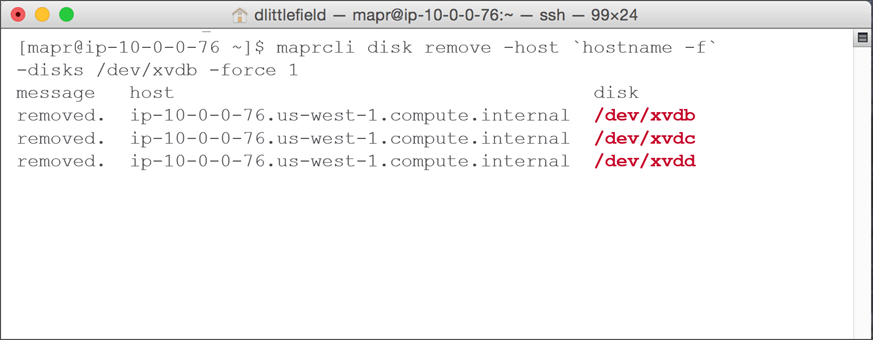
- Remove failed disk report log
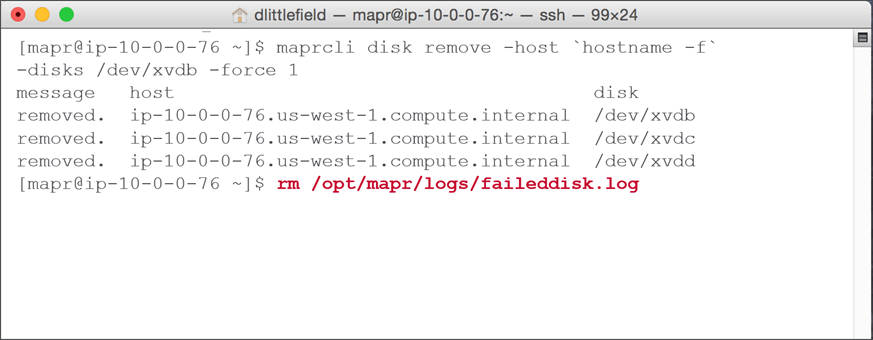
- Run
$ maprcli disk addwith list of disk being replaced.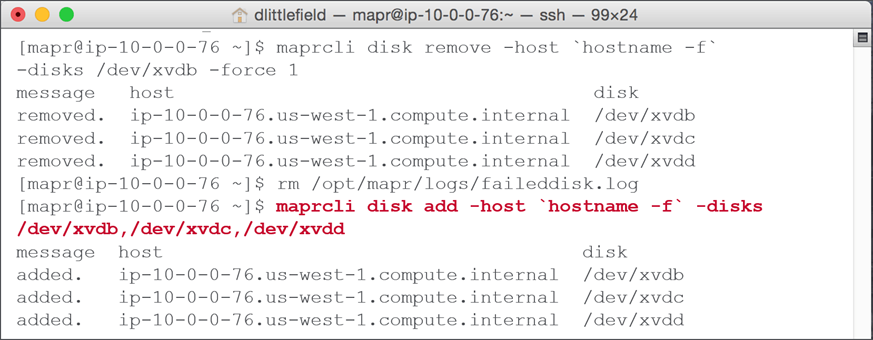
Add and Remove Disks
Best Practices
- Add disks in groups to form a storage pool
- If you add a single disk a storage pool of single disk is created.
- If you add multiple disks MapR will automatically generated storagepool(s) from them.
- Add disks with homogenous sizes and speeds
- Optimize performance
- Maximize capacity
- If you add heterogenous disk the performace and capacity is limited by slowest and lowest of the pool(randomly grouped).
- Add disks in groups by size ( or performance like SSD vs HDD); this ensures that only disks of the same size go into a storage pool
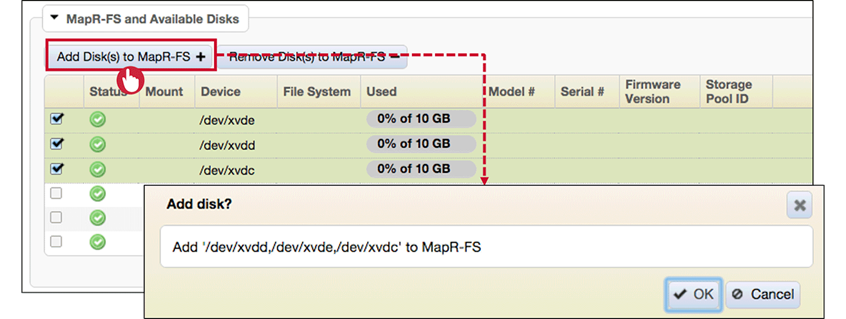
Procedures: Adding and Removing Disks
Add Disks
After physically installing the new disks we can add them to MapRFS using MCS or CLI as follows :
Remove Disks
- Removing disk removes the entire storage pool(all the other disks in the pool too)
- Removed disks no longer contain usable data
- Make sure data exists elsewhere (storagepool replicated). GUI will warn if the data is not replicated elsewhere.
Perform Node Maintenance
Decommissioning vs. Maintenance
- Decommissioning : Permanently remove from cluster
- Failed services
- Disks unrecoverable
- corrupted filesystems or OS
- Maintenance : Plan to perform an action but keep the node as part of the cluster
- Upgrade the OS
- Add or replace disk drives
- Diagnose problems

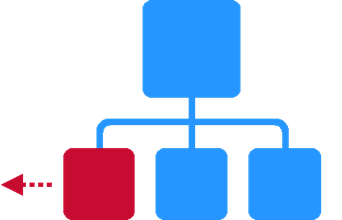
Decommission a Node
Decommission a Node
- Move node to the
/decommissionedtopology- Doesn’t need to be named that but move the node to a topology outside of
/data - Wait for replication to finish
- Verify volume information removed
- Doesn’t need to be named that but move the node to a topology outside of
- Stop Warden and ZooKeeper
- Run
maprcli remove node - Remove installed packages
Clean Up
- Remove
/opt/maprdirectory - Remove MapR core files in
/opt/cores - If removed node has CLDB or ZooKeeper, run
configure.shon all other nodes to maintain HAconfigure.sh –Cif CLDB node changedconfigure.sh –Zif ZooKeeper node changed
Perform Maintenance on a Node
Maintenance Overview
- No need to decommission
- Run
maprcli node maintenance - Replication starts after specified
–timeoutminutes - If multiple nodes, perform sequentially
- Don’t offline more than half of the ZooKeepers
- Don’t offline all CLDB or ResourceManager nodes
Perform Maintenance
- Issue node maintenance command:
$ maprcli node maintenance -nodes <node> –timeoutminutes <minutes> - Stop Warden
- Stop ZooKeeper (if installed on node)
- Perform maintenance and reboot
Add Nodes
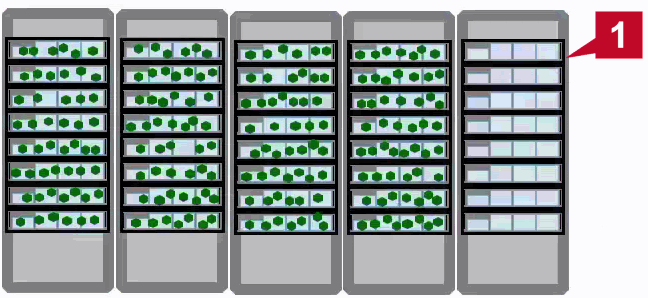
Expand a Cluster
When a new node is added to existing cluster you need to consider
- Node Topology
- How Management services are dispersed throughout the cluster?
- How data populates?
Node Topology
- Rack is a typical failure domain as some outages can take down entire rack.
- Rack can support 15+ nodes, you should consider spreading nodes evenly across three racks.
- By default three replicas of each data container, having three racks allow three sub-topology and containers can be replicated across three racks.
- Use fewer nodes per rack to distribute cluster nodes
Management Services
- If you have multiple management services on a node, it’s recommended to move them to the newly added node
- Recommended to put NFS service on all the nodes.

Data Considerations
- New data written randomly, weighted toward new nodes so gradually data is distributed.
- Alternatively distribute data more quickly with disk balancer after a new node is added.
Add Nodes
Here is the overview of steps performed when adding a new node. Refer MapR documentation for more details
Prepare
- Set default topology to /newnodes
- Optional
- Verify node specifications
- Create MapR user
- Add MapR repository
Install and Configure
- Add MapR package key
- Install MapR service packages
- Run configure.sh
$ configure.sh -C <cldb nodes> -Z <zk nodes> -N <cluster name> -M7 - Start Warden on new node
Finish Up
- Format and add disks
- Set node topology
- Mount cluster
- Optional
- Only if NFS installed
Troubleshooting
Troubleshooting Different Problem Types
How Do You Know There’s a Problem ?
The three common give-aways are :
- Alarm raised
- Performance issues
- Jobs failing
Resources
Resources
There are several resources to consult during troubleshooting.
- Log files
- MapR documentation
- MapR Answers
- Apache forums and websites
- MapR Support (with Converged Enterprise Edition)
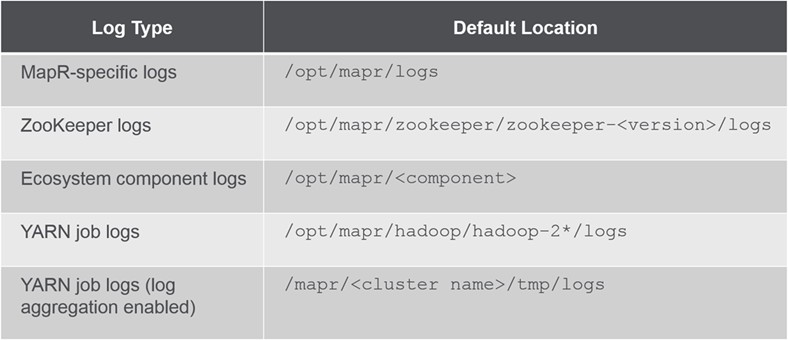
Log File Locations
This table lists some of common log types and their default locations. Some are found in local filesystem and while others in MapRFS
Log File Retention
Many logs expire automatically, so its possible for long running jobs logs are deleted before completion. You can change the retention times.
Troubleshooting Scenarios
Service Not Running
- Typically corresponds to a raised alarm
- Warden will attempt start or restart 3 times
- Each service has its own logs in
/opt/mapr/logs- Don’t forget to check Warden logs
Service Problems
- Open two terminal windows
- Window 1:
$ service mapr-warden stop - Window 2:
$ tail –f /opt/mapr/logs/warden.log - Window 1:
$ service mapr-warden start
Cluster Startup Issues
- ZooKeepers up?
$ service mapr-zookeeper qstatus - Review
warden.logandcldb.log - Get
maprcli node cldbmasterto succeed - Troubleshoot individual services
Data Not Available
- Is affected volume node-specific?
/var/mapr/local/<node name>- Is node offline?
- Failed disks and nodes
- Permission problems
Jobs Not Running
- Start with the YARN job logs
- command line
- ResourceManager page (
<IP address>:19888)
- Permissions problems
- Resource problems
- Recommended to run Yarn Log Aggregator to retain logs for long time centrally in MapRFS.
Degraded Performance
- Check
/opt/mapr/logs/mfs.log-3- Failures communicating with the CLDB nodes or other servers?
- Check node resources
- CPU, memory, swap space, disk space, network
- Isolate management services
Use Support Utilities
Tools
Core Files
- Copies of contents of memories when certain anamolies are detected.
- Located in
/opt/cores- Name includes service involved
- An alarm is raised when a core file is created
- No immediate action required
- Service will automatically restart
- Forward to MapR Support when possible
fsck
- Find/fix file system inconsistencies
/opt/mapr/server/fsck
- Repair storage pools after disk failure
- Verification or repair
- Use
-rfor repair
- Use
Caution:
Using fsck -r can result in loss of data. Contact support first!
gfsck
- Find/fix cluster/volume/snapshot inconsistencies
/opt/mapr/bin/gfsck
- Scans and repairs a cluster, volume, or snapshot
- Typical process
- Take storage pool offline
- Run
fsckon storage pool - Bring storage pool back online
- Run
gfsckon affected cluster/volumes/snapshots
mapr-support-dump.sh
- Collects information/logs from a single node
$ /opt/mapr/support/tools/mapr-support-dump.sh - Output at
/opt/mapr/support/dump- Creates a
.tarfile
- Creates a
mapr-support-collect.sh
- Collects information/logs from entire cluster
$ /opt/mapr/support/tools/mapr-support-collect.sh - Output at
/opt/mapr/support/collect- Uses SSH and SCP
- Creates a
.tarfile
Leave a Comment