
Data Access and Protection
Access Cluster Data
Access Data
Access Data with HDFS
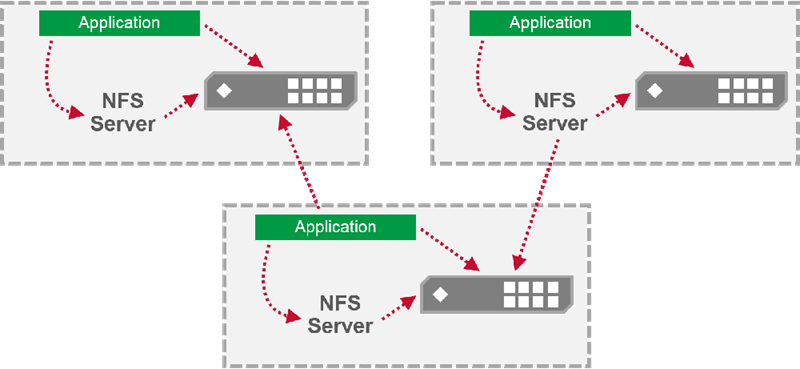
Access Data with MapR-FS and NFS
Features
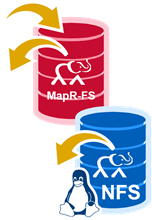
- Files in MapR-FS are fully read-write
- Read files as they are written
- Overwrite files
- Modify files in place
- Direct-access NFS
- Easily access data with Linux commands
Direct-Access NFS
- Read Performance
Mounting the Cluster
- Mount your cluster file system locally
/mapr/my.cluster.com/by default
- Use Hadoop jobs or standard Linux commands

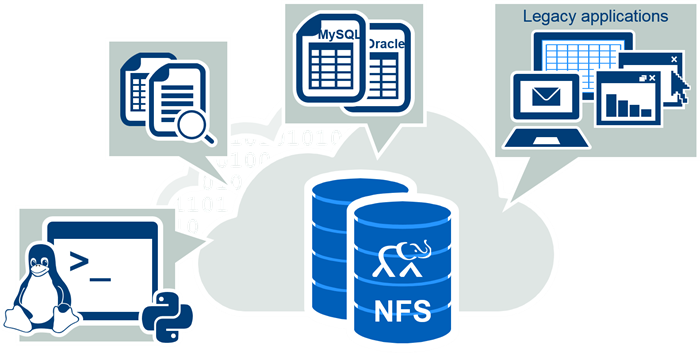
Handling Data
Set up Client Access
Types of Client Access
There are several ways to setup client access with MapR using :
- Direct Access NFS™
- MapR Client
- MapR POSIX Client
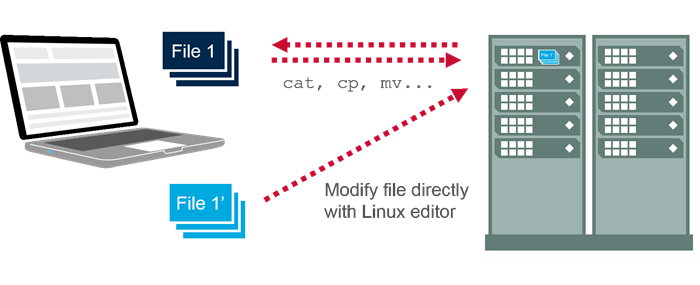
Direct Access NFS
- Overview
- Mount the cluster via NFS
- Read and write cluster data directly
- NFS mounting models:
- Gateway
- Collocation
- Self-mounting
-
Gateway
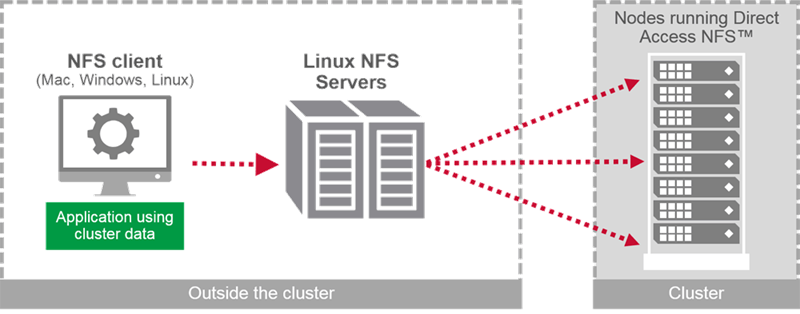
-
Collocation

- Self-Mounting
- Run Direct Access NFS on cluster node and mount via localhost
- Run Direct Access NFS on cluster node and mount via localhost
- Mounting Procedure
- From the client machine:
$ mkdir /mapr $ mount -o tcp,ver=3,nolock <MapR NFS_node>:/mapr /mapr $ ls /mapr/<my cluster name>/<path_from_mfs_root> - With local NFS server:
$ mkdir /mapr
$ mount -o tcp,ver=3,nolock  localhost:/mapr /mapr
$ ls /mapr/<my cluster name>/<path_from_mfs_root>
- From the client machine:
When mounting an local NFS server on a cloud based cluster use localhost or loopback address 127.0.0.1.
Don’t use the nodes ipaddress as that actually routes the network out and back in.
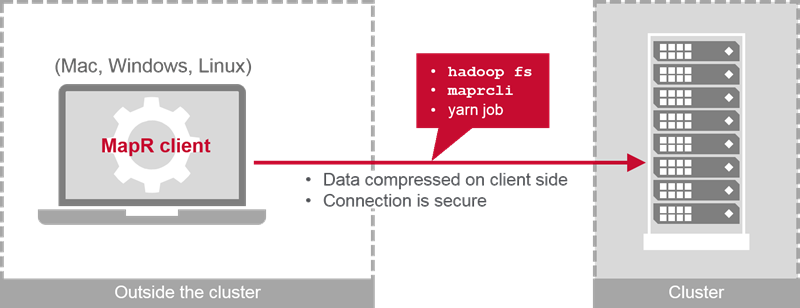
MapR Clients
MapR Client
MapR client is available for non-cluster nodes.Instructions differ based on OS.
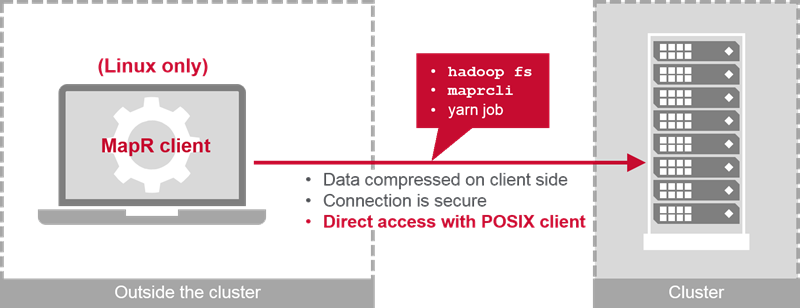
MapR POSIX Client
Along with regular access , Direct posix access is supported only in linux.Compared to native NFS posix
- Data is compressed on client side before sending to cluster.
- Uses a secure direct connection between client and cluster.
MapR POSIX Client Types
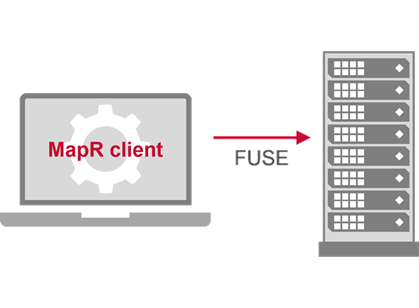
- Starting MapR5.1 FUSE-based posix client are released instead of NFS loopback.
- Basic
- Up to 1 GB/sec
- 10 free
- Platinum
- Up to 5 GB/sec (hyper-threading disabled)
- Paid
Configure Virtual IP Addresses
What is a VIP?
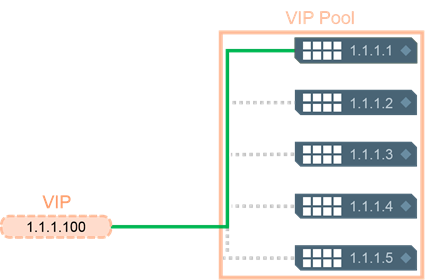
- A virtual IP address
- A “pool” of static IP addresses
- If the connection to the static IP address goes down, the VIP switches to another address in the pool
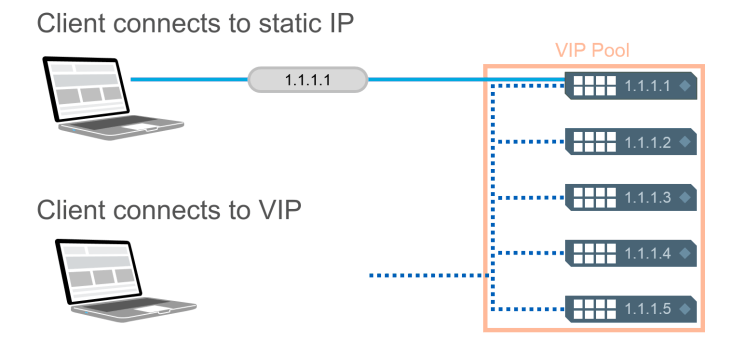
Static IP versus Virtual IP
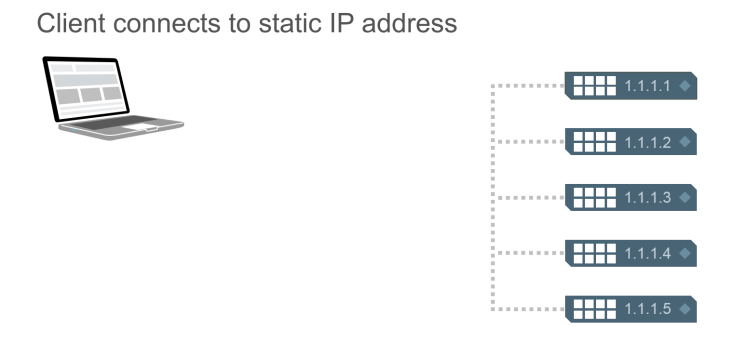
Static IP
A client connects directly to the IP of the node.
VIP
Alternatively a client can connect to a virtualIPaddress which has access to a pool of nodes.
When the node1 goes down the client will automatically connected to another node.
Making NFS Highly Available
Configure VIPs
-
Configure VIPs through the MCS or through the CLI:
$ maprcli virtualip add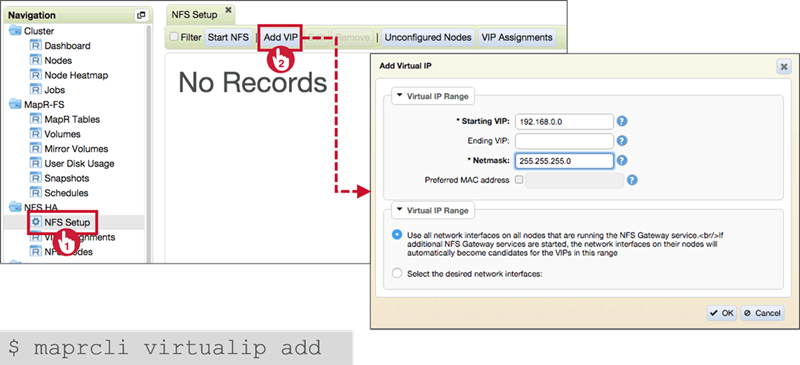
-
To create a VIP pool with desired subnet of network interface
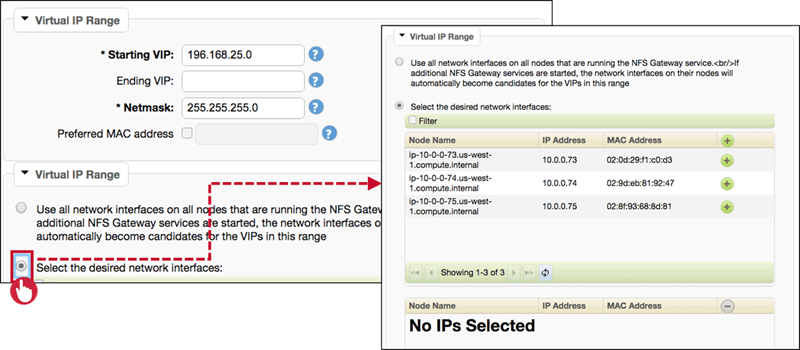
-
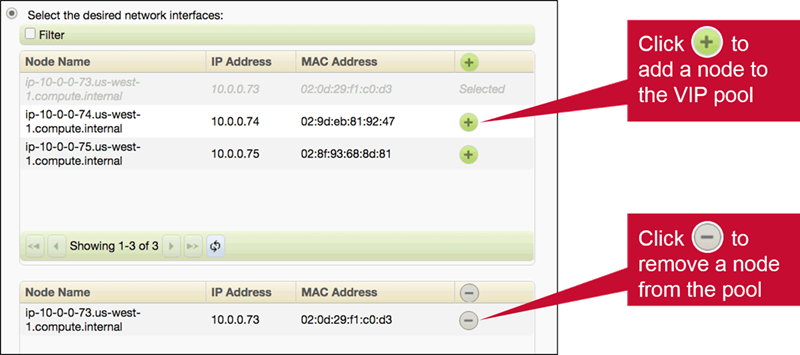
Add or remove a node to VIP pool
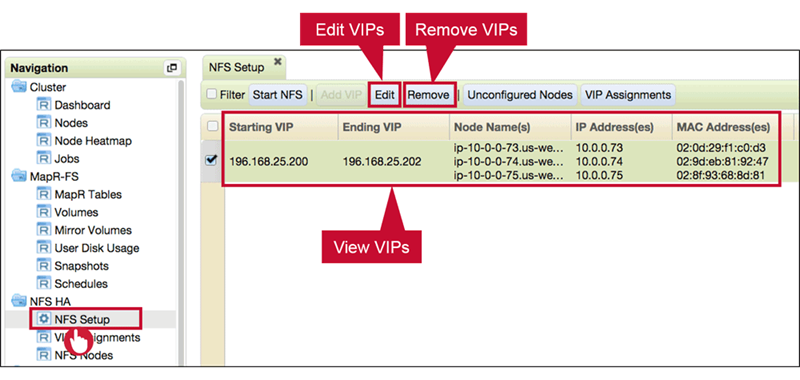
Review VIPs
-
Review or Modify VIP Pools
-
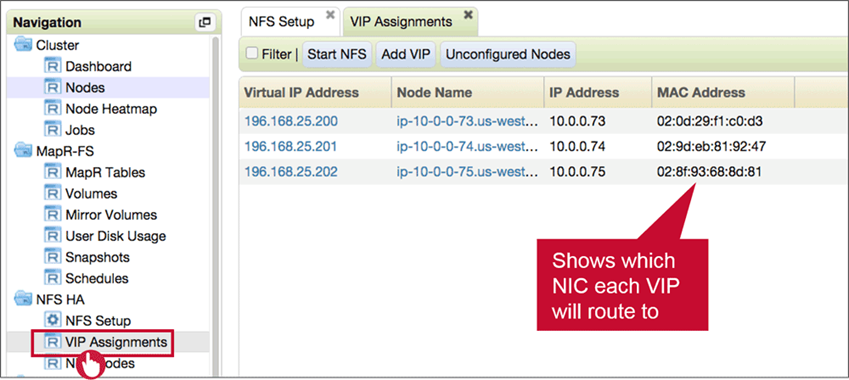
View VIP Assignments
-
ifconfig for VIPs (we can see virtual cards created)
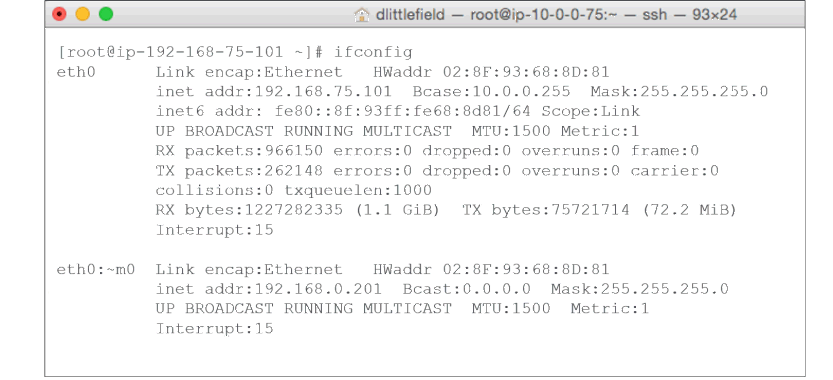
Summary
- Each VIP will route connections to a single node
- Client connections will remain on the same node until failover
- VIPs are not load balancing
- Set up round-robin DNS on your DNS server
- Or use third-party load balancers instead
- You can select which NICs are assigned to each VIP
- If not all NICs are in the same subnet
- If you wish to restrict VIPs assignments to specific NICs
Control Access to the Cluster
Who Can Do What?
Depends on permissions granted:
- At the cluster level
- MapR cluster operation permissions
- At the volume level
- MapR volume operation permissions
- Root directory permissions (POSIX)
- Access Control Expressions (ACEs) to access volume data
- At the file/directory level
- UNIX mode bits (POSIX)
- MapR ACEs
Access Control Expressions (ACEs)
Working with Whole Volume ACEs
Snapshots
Understand Snapshots
Overview
What is a Snapshot?

- A view of a source volume at a specific point in time
- Use to:
- Recover from user errors, data corruption, or program errors
- Create static data sets for queries or auditing
- better than replication or mirroring.
Characteristics of a Snapshot
- Read-only point-in-time image of a volume
- Doesn’t copy data but simply create pointers to the data
- Tiny space penalty
- Very quick(seconds)
- Can scheduled or taked on demand
- Persists until user-set expiration
Where Do Snapshots Go?

- Top level of every volume
.snapshotdirectory- Exists even if empty
- Not visible to
ls –ltarhcommand - Accessed via NFS or Hadoop shell possible if we include
.snapshotin the query path.
Snapshot Architecture
Use Case: Protection From Human Error
Situation
You know human error is one of the most common causes of lost or corrupted data, and you want to protect against loss of time and data.
Solution
Make frequent snapshots of key data. To control space requirements, set reasonable retain times.
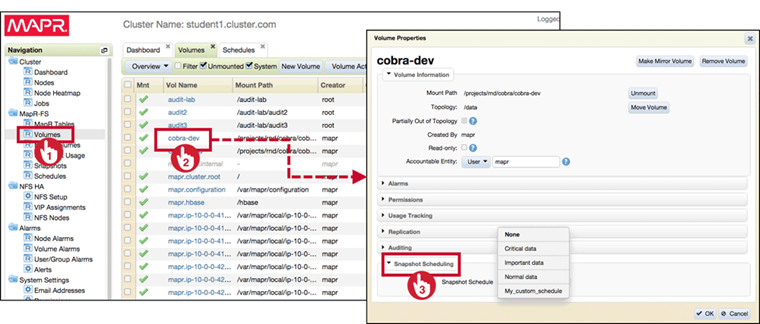
Configure and use Snapshots
Take a Snapshot
Manual Snapshot: MCS
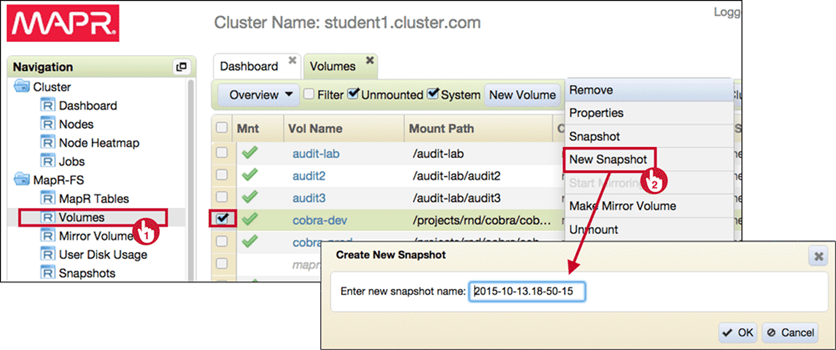
Manual Snapshot: CLI
- Command line:
$ maprcli volume snapshot create -volume <vol name> -snapshotname <snapshot name> - Manual snapshots do not expire automatically
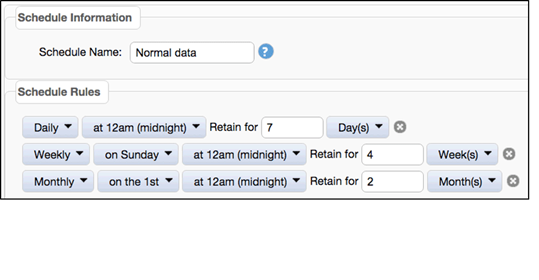
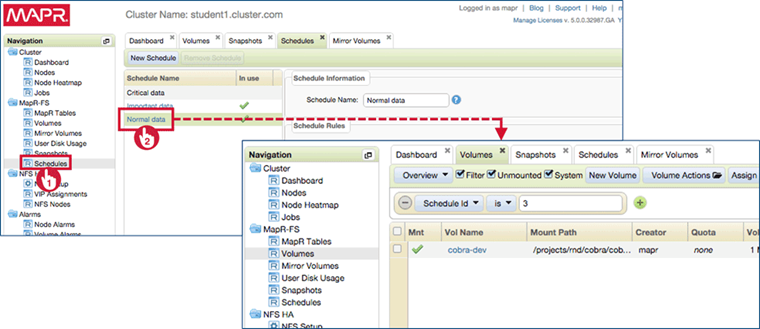
Snapshot Schedules
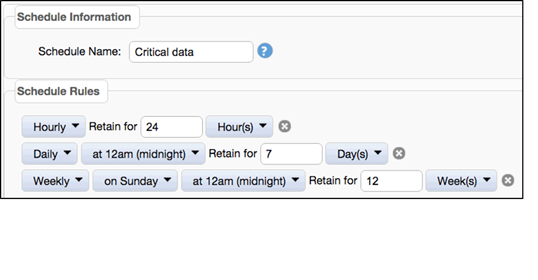
Scheduled snapshots expire automatically. Normal, Important and Critical are pre-defined schedules.
-
Normal
-
Important
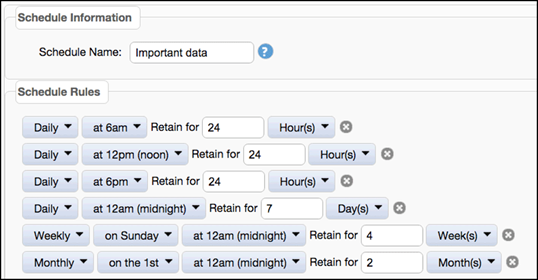
-
Critical
-
Custom Schedules
- You can create custom schedules through
- the MCS
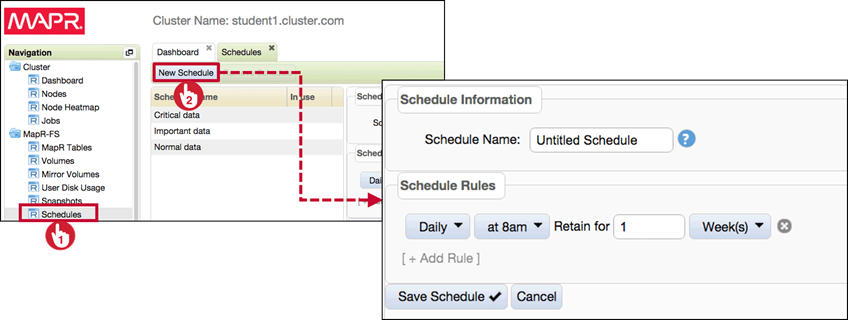
- or by using the CLI:
maprcli schedule create -schedule '{"name":"Schedule-1","rules":[{"frequency":"once","retain":"1w","time":13,"date":"12/4/2018"}]}'
- the MCS
- You can create custom schedules through
Schedule a Snapshot
Display Schedules
Recover Data From a Snapshot
-
Create a Recovery Directory
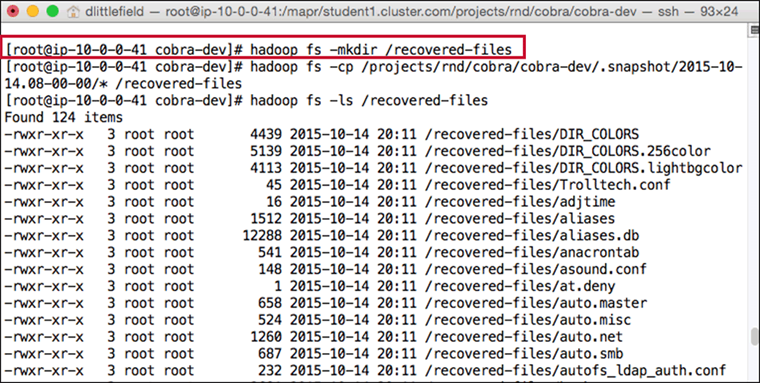
-
Copy Files With Hadoop Commands
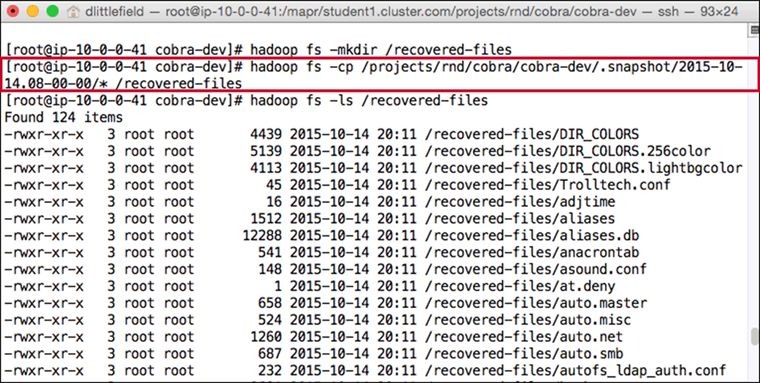
-
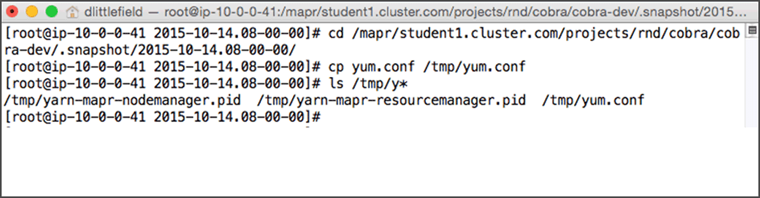
Use Linux commands, if the cluster file system is mounted.
Preserve a Snapshot
Preserving a snapshot removes its expiration date
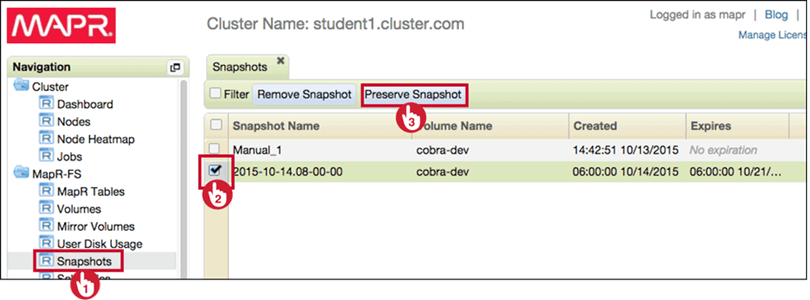
Snapshot Maintenance
- Scheduled snapshots are deleted automatically
- Manual snapshots must be deleted manually (through the CLI or MCS)

Mirrors
Describe Mirroring
About Mirror Volumes
How Mirrors Are Created
Configure and Use Local Mirrors
Create a Local Mirror Volume
Create a Mirror Volume
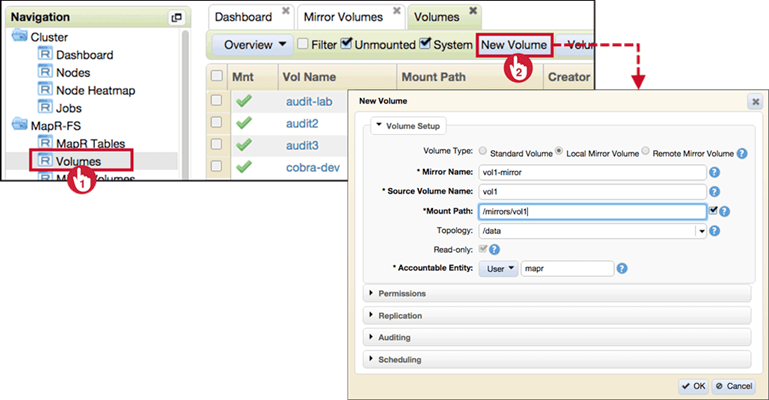
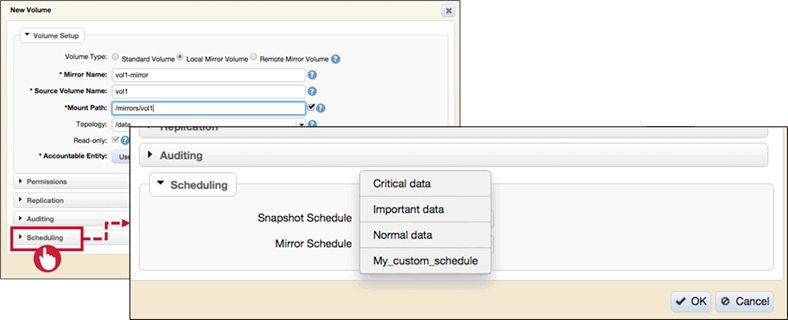
Set a Mirror Schedule
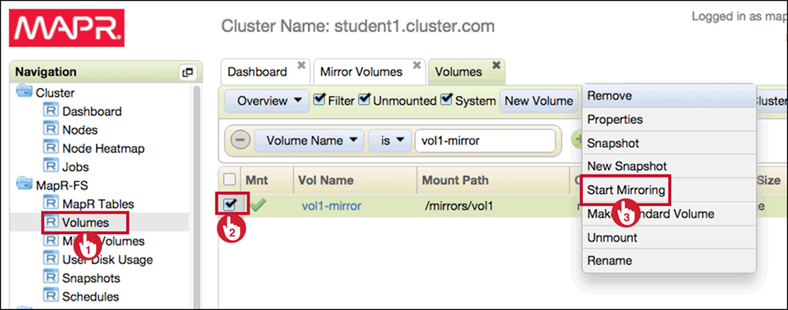
Manually Start the Mirror
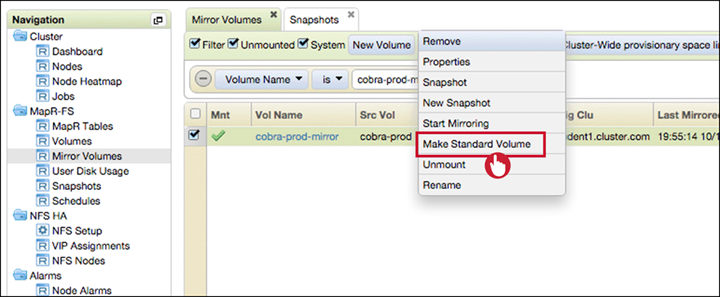
Promote a Mirror
- Promoting a mirror changes it from Read-Only to a standard Read-Write Volume.
- Typically a mirror is promoted when the source volumes remains unavailable.
- Once a mirror is promoted any mirroring schedule associated with the volume is diabled.
Rules for Promoted Mirrors
Important!
- To use promotable mirrors, the source and destination volumes must have the same name and mount point
- Mirror volumes that are promoted to standard volumes cannot be written to until they are explicitly mounted
$ maprcli volume modify -name <name> -type rw
$ maprcli volume mount -name <name> -path <path>
Use Cascading and Remote Mirrors
Cascading Mirrors
- A cascading mirror is a mirror of a mirror of source volumes.
-
Cascading is useful for deployment
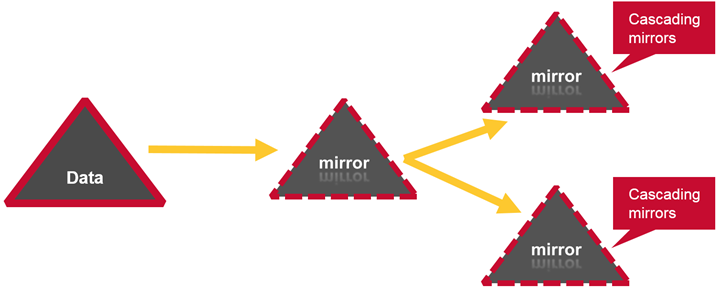
-
Deployment Without Cascading Mirrors :
- Deployment With Cascading Mirrors
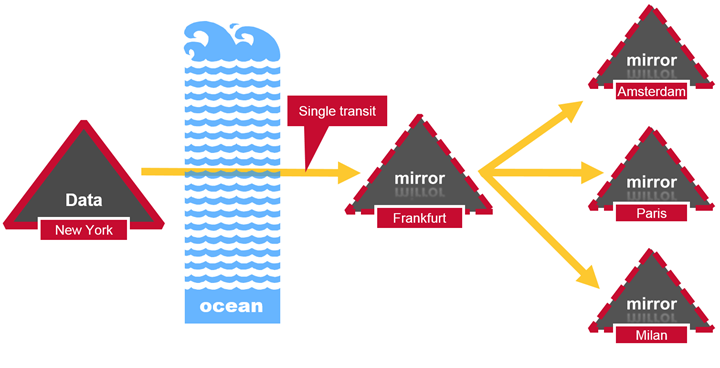
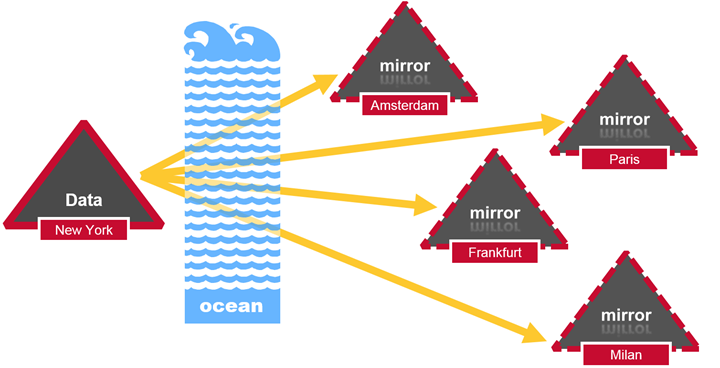
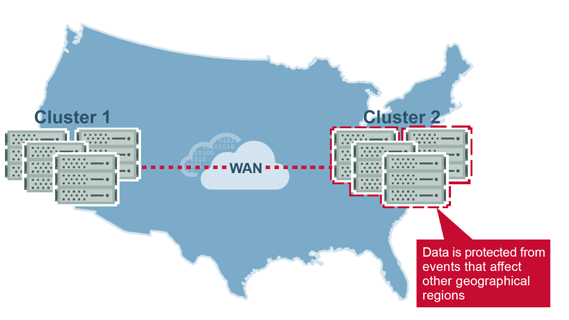
Remote Mirrors
-
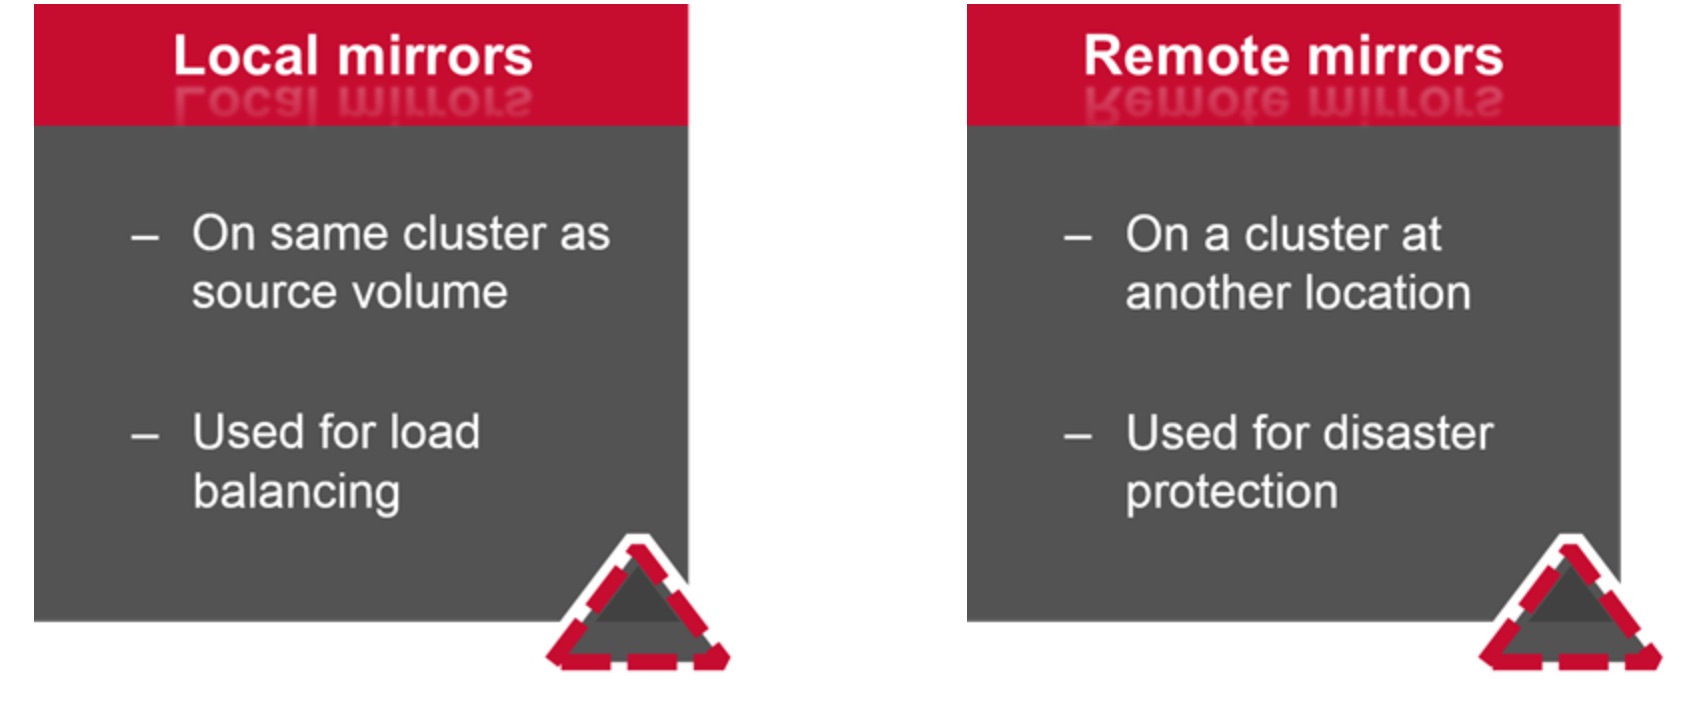
Local vs. Remote Mirrors
-
Remote Mirrors and Data Protection
Review of Mirrors
- Local mirrors
- Source and destination volumes in the same cluster
- Cascading mirrors
- Source and destination volumes are both mirrors
- Remote mirrors
- Source and destination volumes in different clusters
Leave a Comment