
Configure MapR Cluster
Intro
This post covers
- How to configure cluster users, topology, and volumes once the cluster has been installed.
- It also covers the basics of job logs and scheduling jobs.
- Also learn cluster administration with real-world system administrator concepts and practices, including
- Planning, Installation and Configuration, Load Balancing
- Tuning diagnosing deployment issues and performance
- Setting up a Hadoop cluster with direct access NFS, snapshots
- Monitoring cluster health, resolving hardware issues and troubleshooting job errors.
Manage Users and Groups
Cluster Users and Groups
- MapR uses native OS configuration
- users/groups must exist at the OS level with same uid and gid on all nodes
- use LDAP to simplify administration
- Assign permissions
- cluster operations
- volume operations
- Set disk use quotas
- There are two users who are granted permissions by default when MapR was installed
root- MapR software is installed as the root userMapR Administrative User- has full privileges to administer cluster and runs cluster services. specified during install (default is mapr)
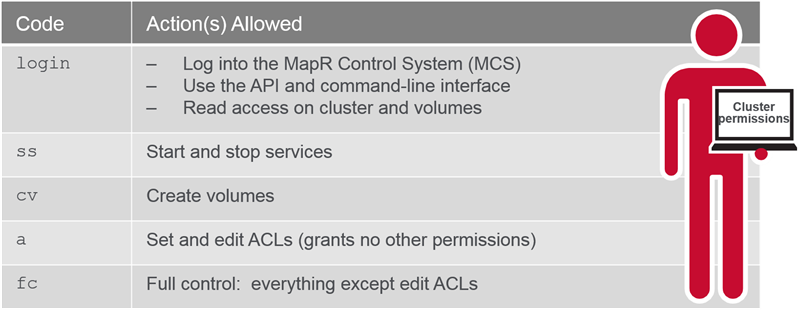
Cluster Permissions
-
Users and groups can be assigned permissions at three levels: the cluster level, the volume level, and for cluster files and directories.
-
Assign Cluster Permissions: MCS
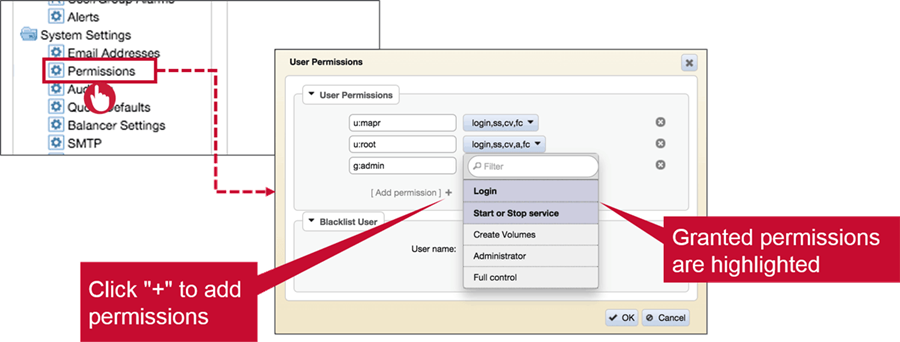
- Assign Cluster Permissions: CLI
maprcli acl set(overwrites existing permissions)maprcli acl set -type cluster -user mark:fc sharon:loginmaprcli acl edit(edits existing permissions)maprcli acl edit -type cluster -group mark:login
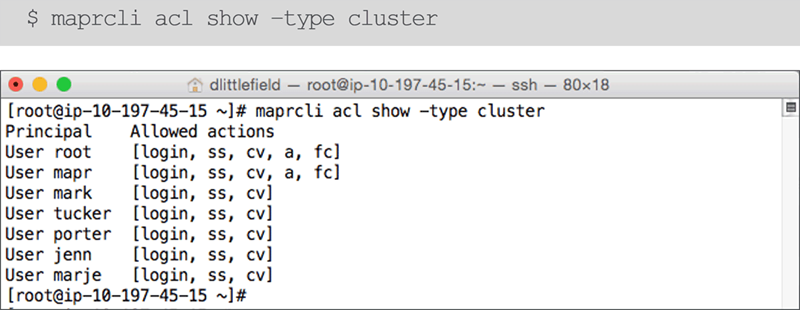
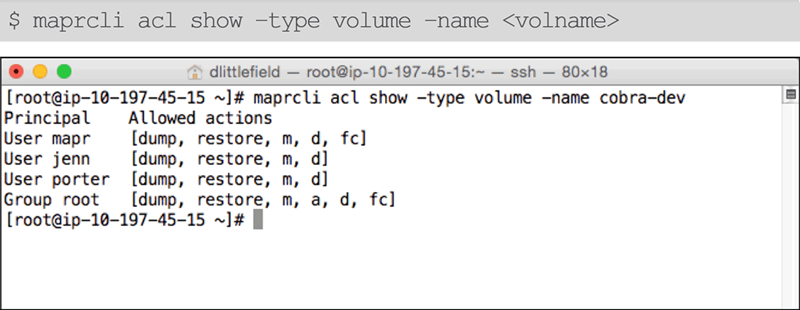
- View Cluster Permissions: CLI
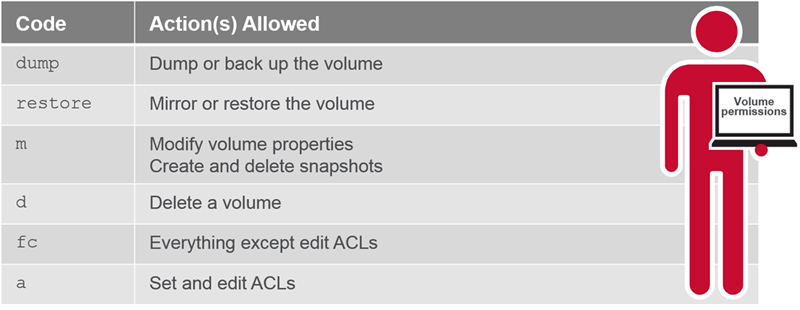
Volume Permissions
-
Users and groups can be assigned permissions at three levels: the cluster level, the volume level, and for cluster files and directories.
-
Assign Volume Permissions: MCS
- Assign Volume Permissions: CLI
maprcli acl set(overwrites existing permissions)maprcli acl set -type volume -name vol11 -user mark:fc sharon:dump,mmaprcli acl edit(edits existing permissions)maprcli acl edit -type volume -name vol11 -group mkt:dump,m
- View Volume Permissions
MapR-FS Permissions
- MapR-FS Permissions is
- POSIX permissions model
- Set read, write, and execute permissions for user (owner), group, and other
- Change with:
hadoop fs –chmodhadoop fs –chown- Linux commands, if cluster is mounted
- Examples
- Full permissions for user; read and execute for group/others:
$ hadoop fs -chmod 555 myfile $ hadoop fs -chmod u=rwx , g=rx, o=rx myfile $ hadoop fs -chmod u=rwx , go=rx myfile - Recursively set directory permissions:
  $ hadoop fs -chmod -R 600  /user/myvolume
  $ hadoop fs -chmod -R u=rx /user/myvolume
- Full permissions for user; read and execute for group/others:
User and Group Quotas
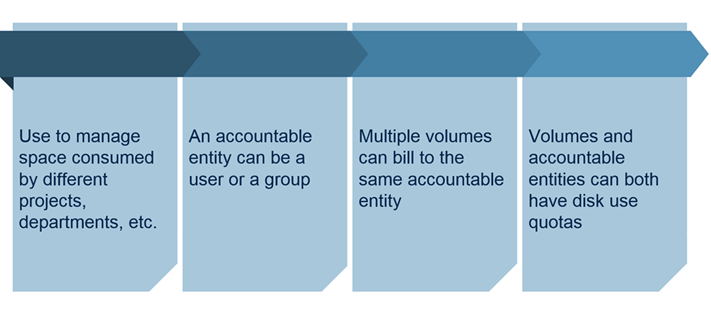
- User and Group Quotas
- Users and groups can be assigned as Accountable Entities (AEs)
- Quotas can be assigned to AEs
- Disk use for an accountable entity:
- Sum of space used by all volumes for which the user/group is the AE
- Volumes can also have quotas
- Advisory and Hard Quotas
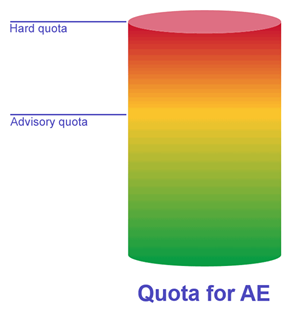
- Hard quota: no additional data will be written to any volume belonging to the Accountable Entity
- Advisory quota: an alarm is raised but data will continue to be written
- Set Default User and Group Quotas
$ maprcli config save -values '{"mapr.quota.group.advisorydefault":"1T"}'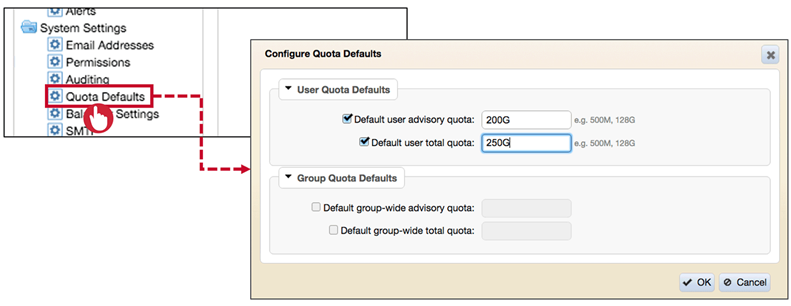
- Set Specific User and Group Quotas
 An individual quota always takes precedence over default AE quota.
Configure System Settings
System Settings
Email Addresses
Configure Email Address with one of the following Options :
- Suffix usernames with @domain as emails
- Use LDAP to retrieve email address for user.

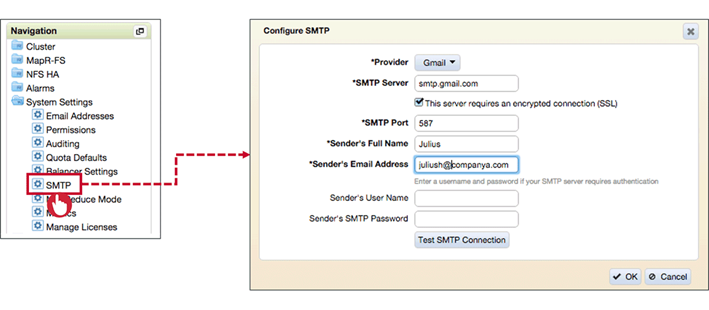
SMTP
Configure SMTP dialogue to send notification via Email as MapR Cluster
MapReduce Mode
Configure Topology
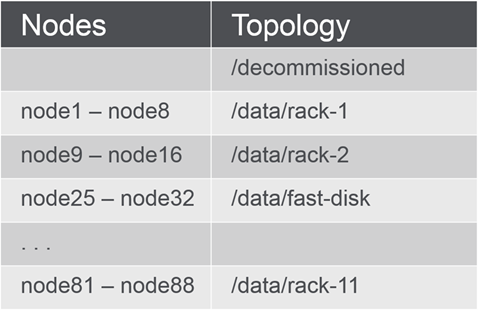
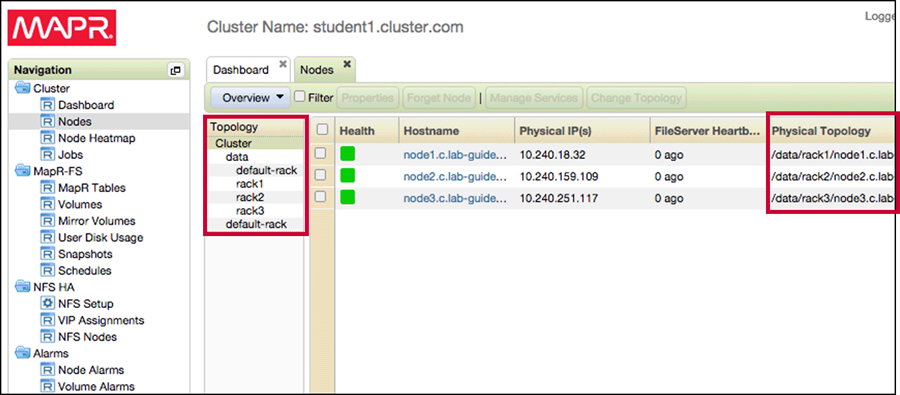
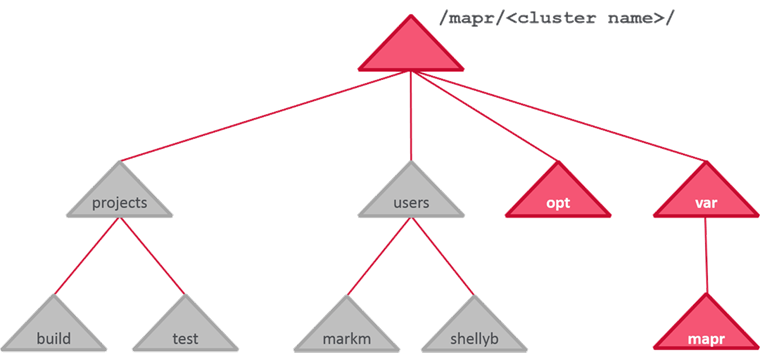
A clusters topology :
- Logically groups nodes
- Guides placement of data
- Based on business requirements and data access strategies
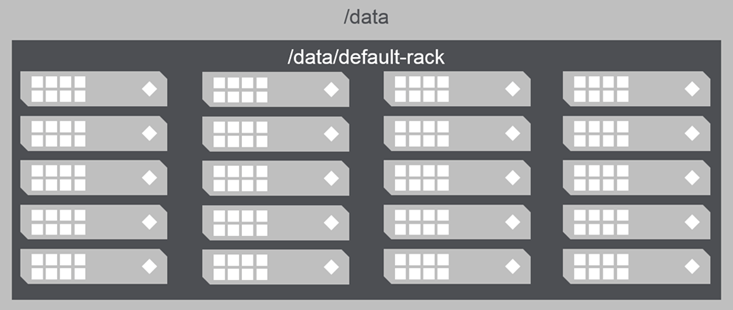
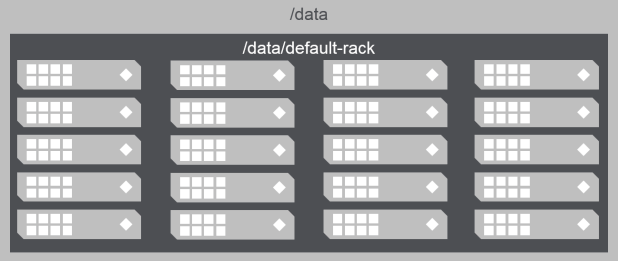
Default Topology
Topology paths are defined much like FS directories but they are not mount-points or directories, but they are simply labels for topologies that illustrate the relationship between group of nodes.
For Example /data/default-rack is sub topology of /data/; so anything inside /data/default-rack topology is part of /data/ topology.
- Default topology for Node: /data/default-rack
- Default topology for Volume: /data
As volumes are created they are assigned to /data; this means data is replicated to any node under /data/ topology.
Topology and Replication
Default Topology and Replication
- MapR-FS attempts to replicate data:
- to different nodes
- in different sub-topologies
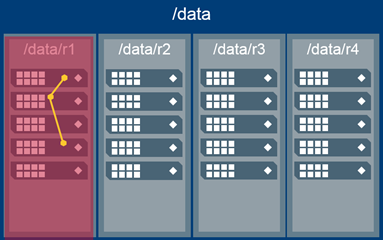
- Without sub-topologies, data may be replicated to nodes in the same rack
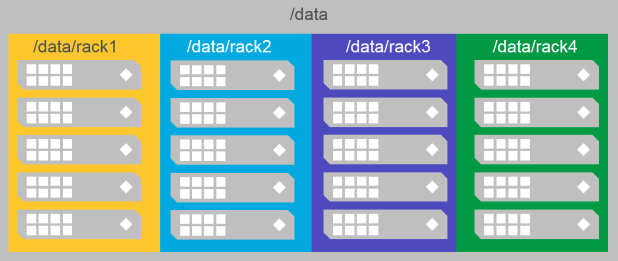
Rack Topology and Replication
- Define a rack topology so data will be replicated to different racks
- Data is automatically replicated to different sub-topologies
Both
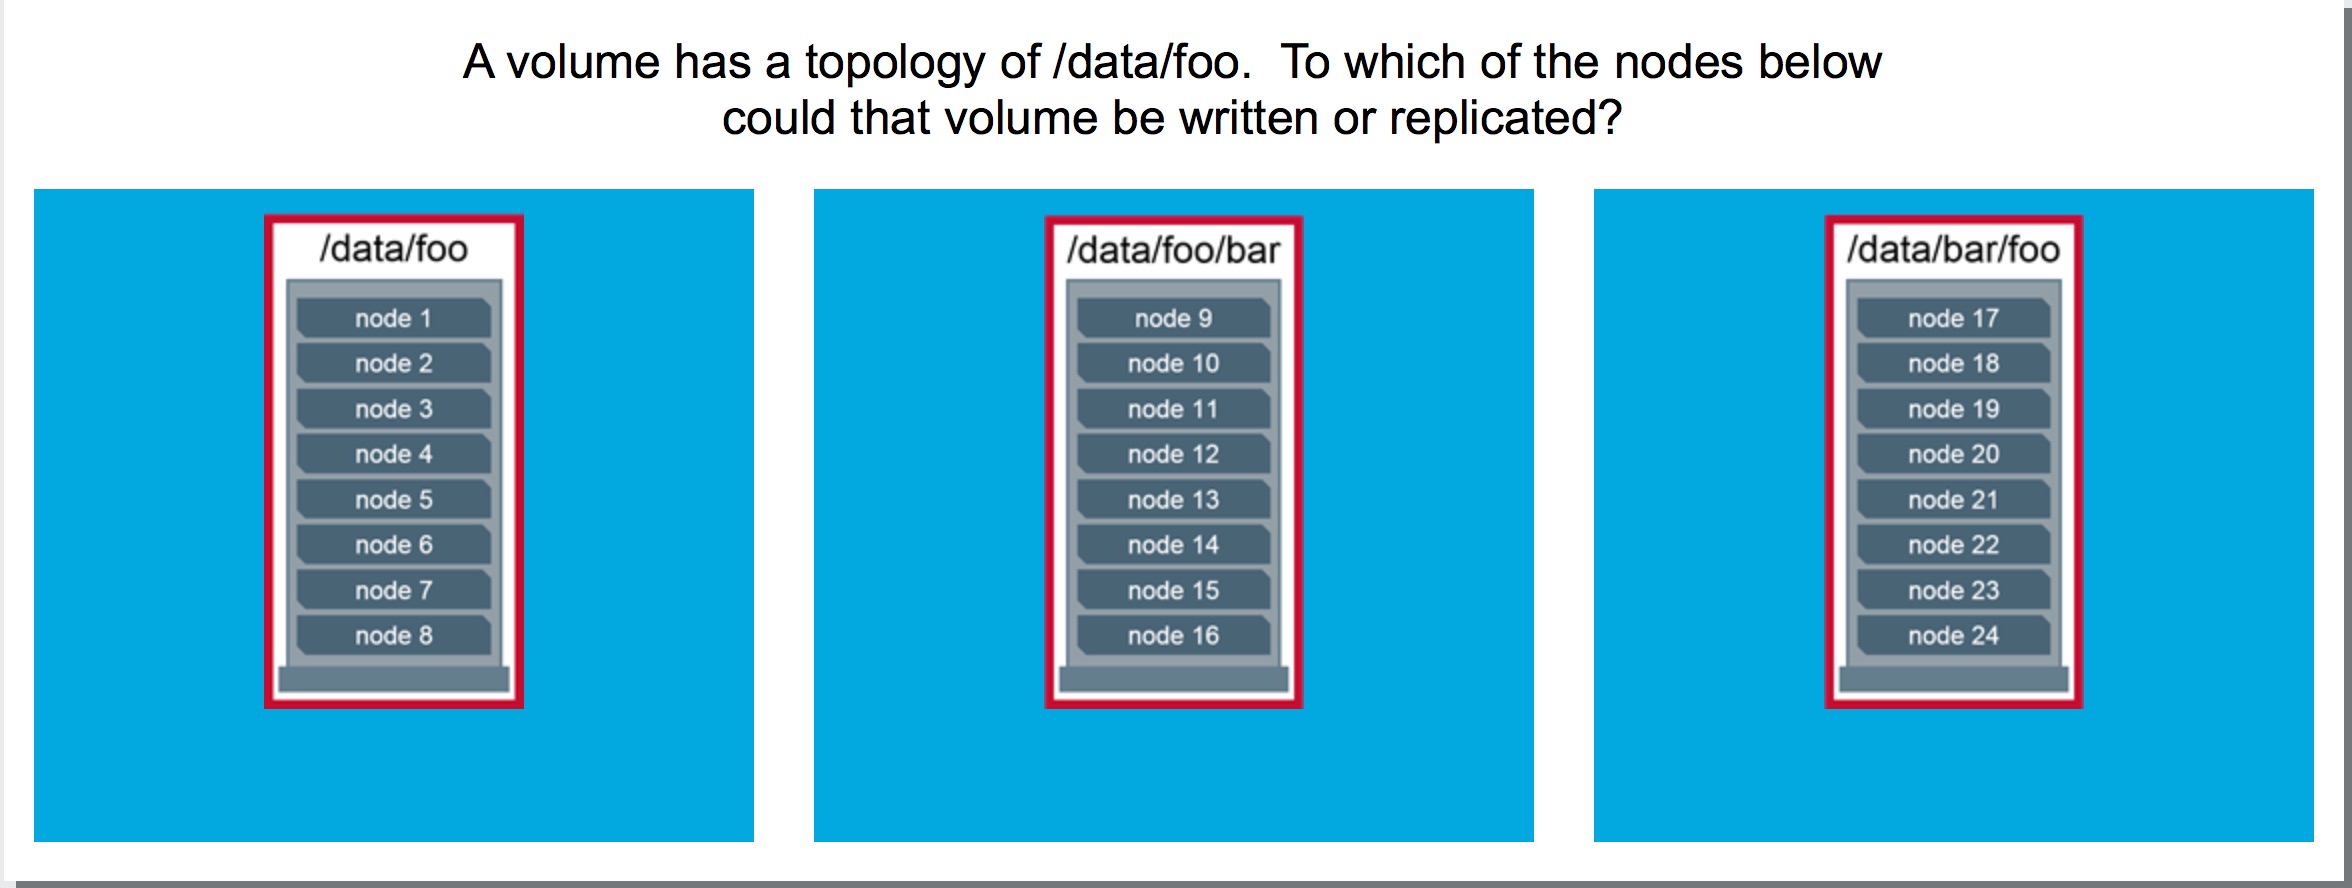
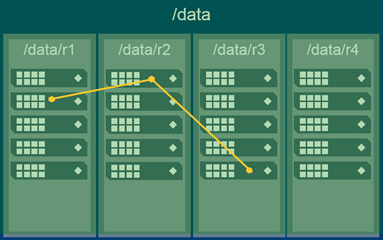
/data/fooand/data/foo/barare part of/data/footopology and hence data is written/replicated on nodes 1-16
Common Topology Strategies
MapR considers each topology rack ( or sub-topology) as a different rack.
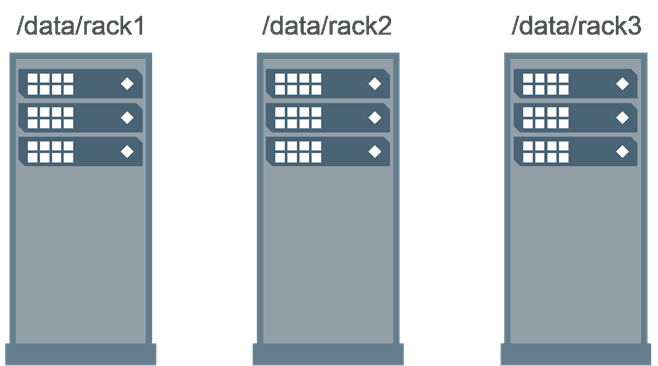
Topology Examples
Topology can be very simple…
…or very complex
Topology for Decommissioned Nodes
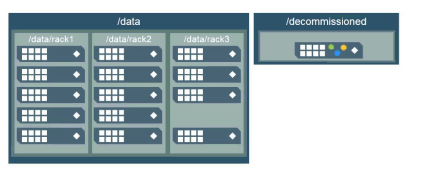
What happens when you move a node to the /decommissioned topology?
When you move a node to the /decommissioned topology, or anywhere outside of the topology all the volumes are in, no new data is written to that node. Also, data on the node in /decommissioned will be moved back into the appropriate topology to maintain the correct number of copies.
Best Practices
- Do not assign volumes to the
“/”topology - Use high-level topologies, such as
/data, for volumes - Use lower-level topologies only if required to constrain data placement
- isolate departmental data
- isolate based on performance requirements
Configure Node Topology
- Have a plan! based on department or requirements.
- Assign a topology to each node according to the plan
- through MCS
- via CLI
- with a text file
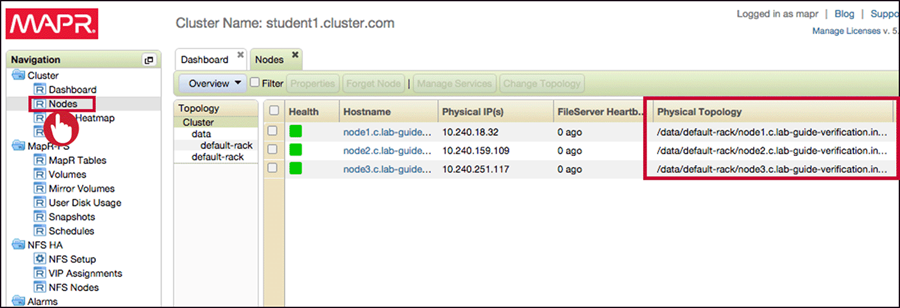
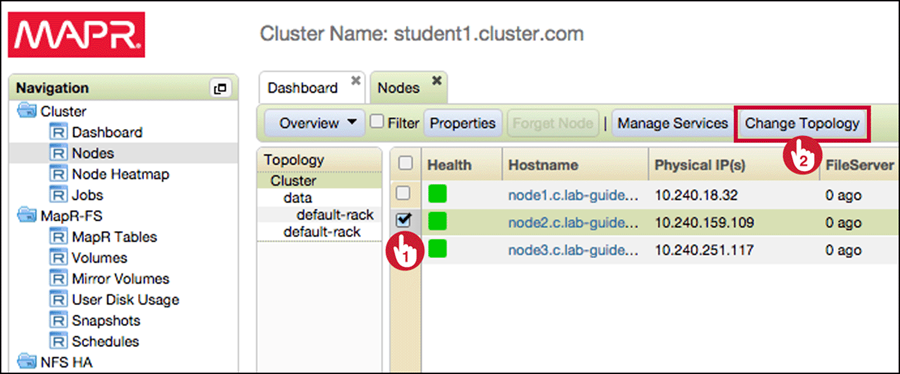
Assign Node Topology through MCS
-
From the dashboard, navigate to Cluster > Nodes
-
Select node(s) and click Change Topology
-
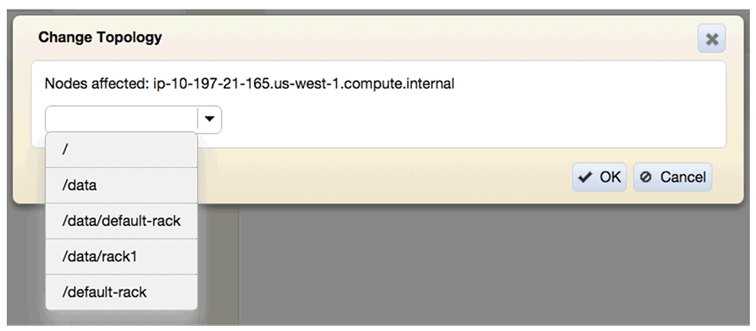
Select an existing topology, or enter a new one
-
The topology column and topology tree are updated
Create the /decommissioned Topology
To create a topology we need assign a node, So
- Assign the
/decommissionedtopology to a node - Move the node back to its appropriate topology

/decommissionedtopology still exists and can be selected later.
Assign/Change Node Topology Through CLI
- Determine the node ID:
$ maprcli node list --columns id - Set the new topology:
$ maprcli node move -serverids <ID> -topology <path>
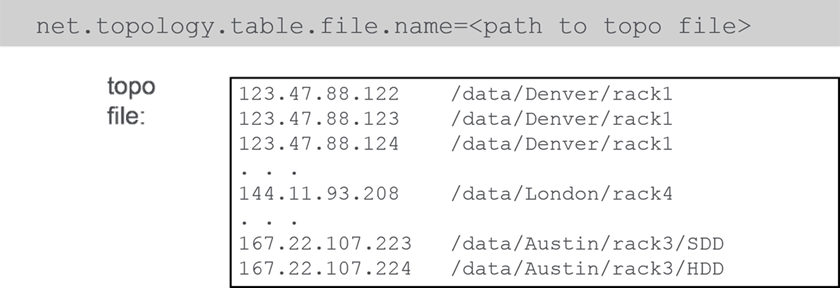
Assign Complex Topologies With a Text File
On large clusters you can specify topology in a text file. Each line in the textfile specified a singlenode and the full topology path for that node.
In /opt/mapr/conf/cldb.conf, set:
Configure Volumes
Describe Volumes and Volume Properties
Recap: Storage Architecture
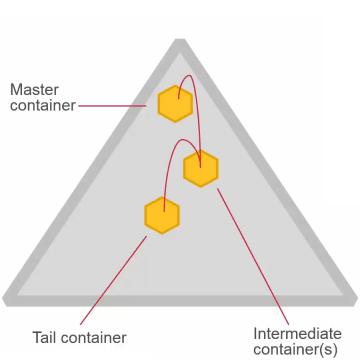
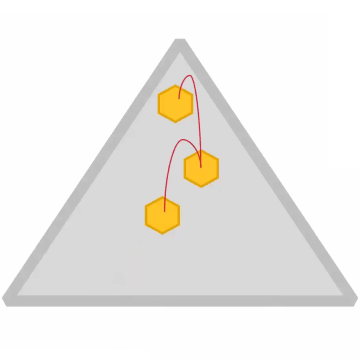
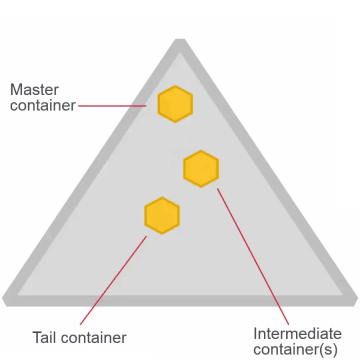
What is a MapR Volume?
Logical unit of data organization and management
- Comprised of containers
- Name containers : Each volume has one named contained. It has metadata and first 64kb of data.
- Data containers
- Volumes may span the cluster or set of nodes depending on the topology.
Volume Properties
-
Name and Mount Path
-
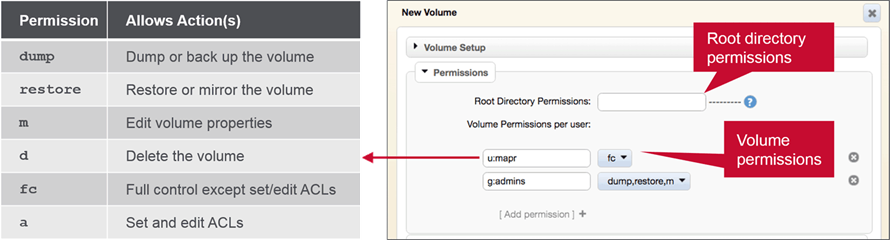
Permissions Volume permissions can be granted to users or groups
-
Topology
- Volume topology set to /data
- Volume topology set to /data/r1
- Volume topology set to /data
Volume Quotas
- Hard and Advisory Quotas
- Hard quota
- No more data written to volume
- Advisory quota
- Alarm is generated
- Hard quota
- What Counts?
Only original, post-compression data counts against a quota.
Example:
- 10 GB source file: 10 GB
- compressed to 8 GB: 8 GB
- replicated 3 times: 24 GB
Only 8GB counts against the quota. Only space occupied by first copy/container counts
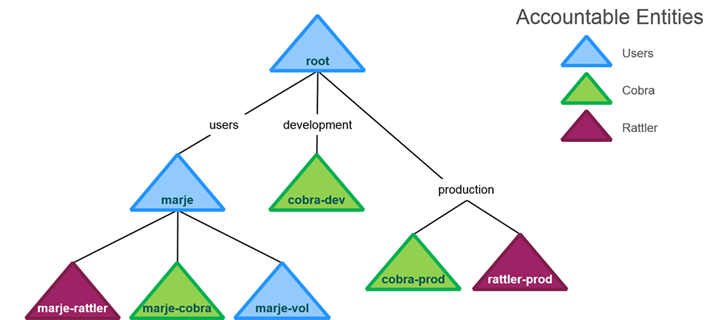
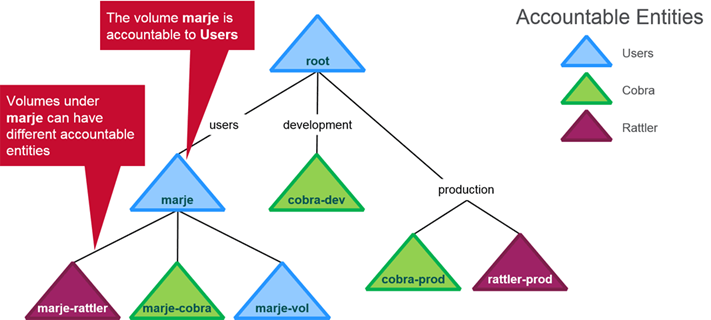
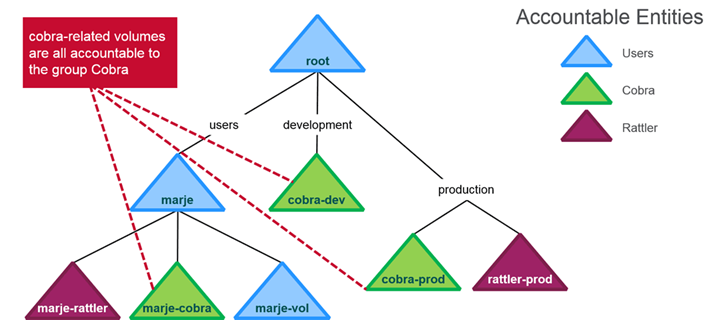
Accountable Entities
- Entity (user or group) accountable for a volume’s usage
- Only one AE per volume
- AEs may also have quotas
- Every volume assigned to an AE counts against the AE’s quota i.e Size of AE’s quota is preferred over Volume Quotas
AEs and Quotas
- Accountable Entities and Quotas
- Volumes and Accountable Entities
- Volumes and Accountable Entities
- Volumes and Accountable Entities
- Volumes, Accountable Entities, and Quotas
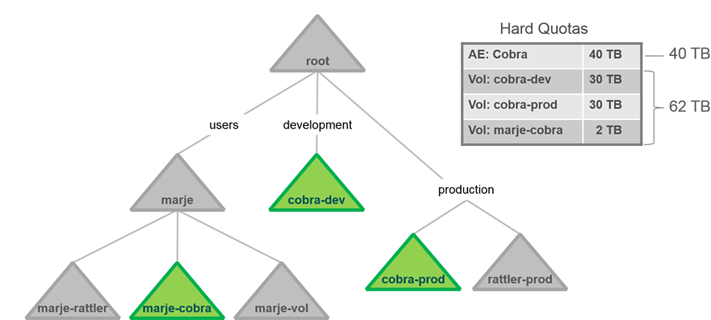 This means combined size of volumes is limited to AE’s Quota 40TB
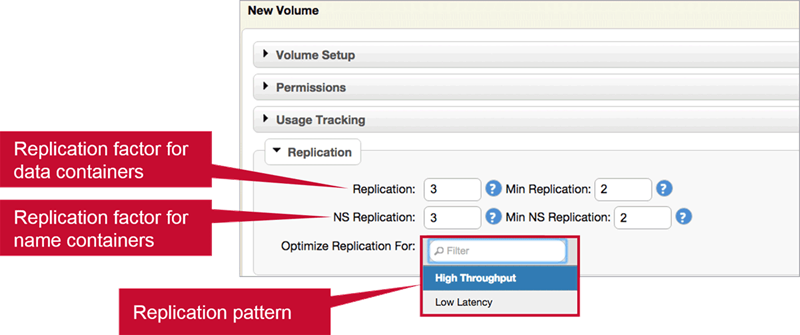
Replication Factor
- Replication factor is set at the volume level (default = 3)
- Applies to all containers in the volume
- Separate replication factors for name containers and data containers is also possible
- Replication factor
- Desired number of copies
- Minimum replication factor (default 2)
- If actual replication count falls below this, an alarm is raised and data is re-replicated immediately
- Disk failure triggers immediate replication
- Node failure triggers replication after a configurable window
- Default: 1 hour
- Set with
maprcli config save
Replication Type
High Throughput

- Once set, cannot change for the volume
- High throughput (chain)
- Default
- Appropriate for most volumes
Low Latency
- Once set, cannot change for the volume
- Low latency (star)
- Best with small files
- Can impact network with large files
Configure Volumes
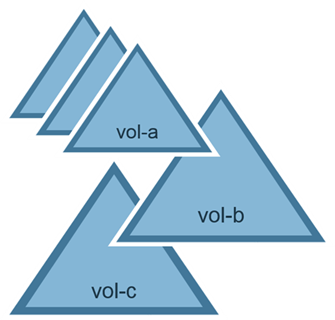
Typical Volume Layout
Some system volumes like /opt/ and /var/. Apart from them we need to create volumes specific to projects and users.
Best Practices
 Create plan and configure volumes before we start loading data into the cluster; some of the best practices involve :
- Create multiple volumes
- Efficiently use snapshots and mirrors (by creating at volumes level)
- Separate and manage resources
- Establish ownership and accountability
- Spread the load of access requests
- Create volumes based on business requirements
- For users, departments, projects, etc.
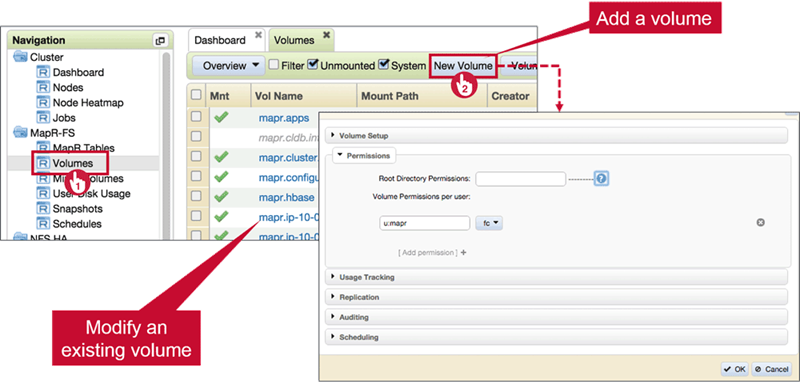
Create Volumes with MCS
Navigate to MapR-FS > Volumes, and click New Volume
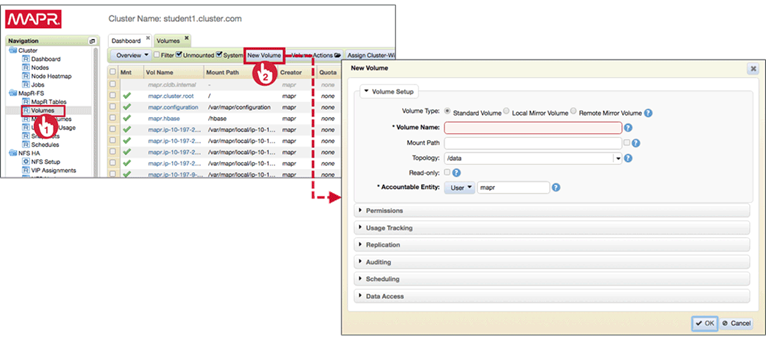
Volume Setup
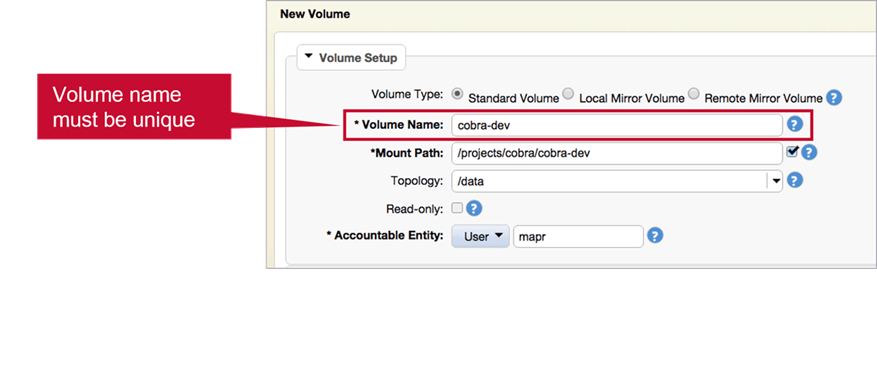
Volume Name
Volume name should be unique if you intend to used same or different mount path.
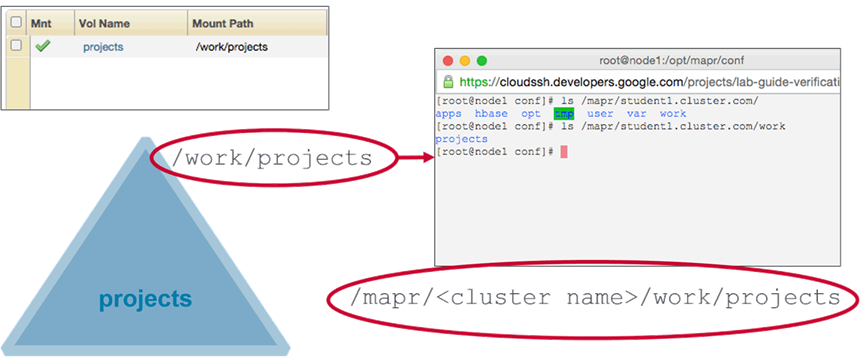
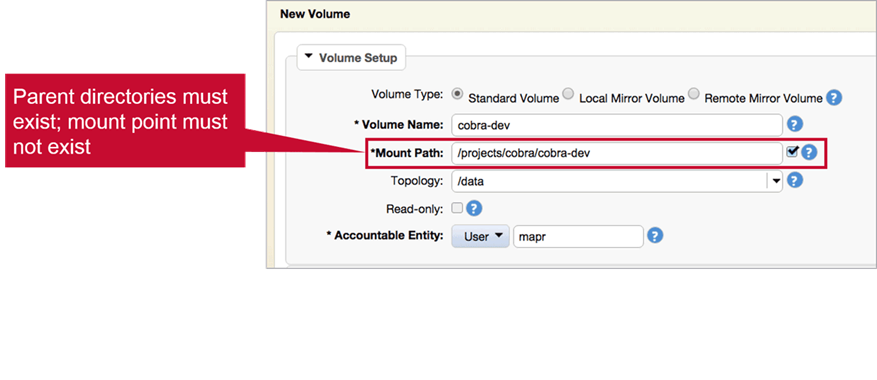
Mount Path
The parent directory should exist but the mount directory shouldn’t.
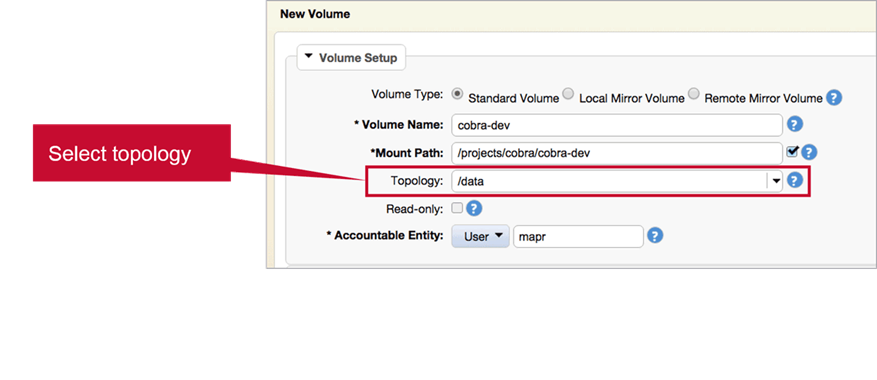
Topology
Read/Write Status
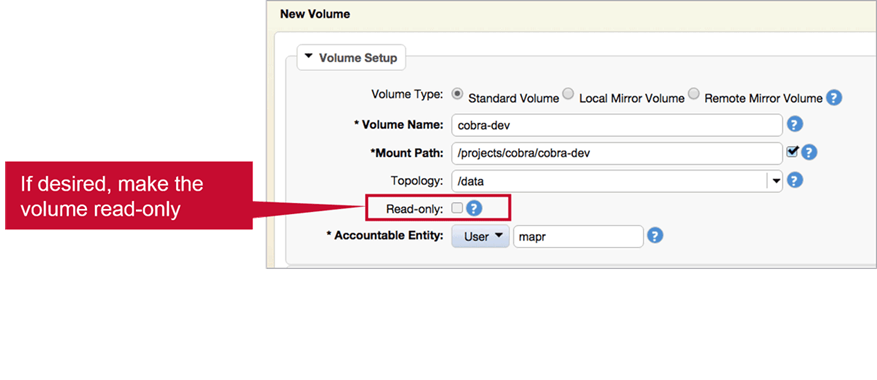 If you want to prevent data in a volume being modified (after loading ; not at creation) Check
 Read-only
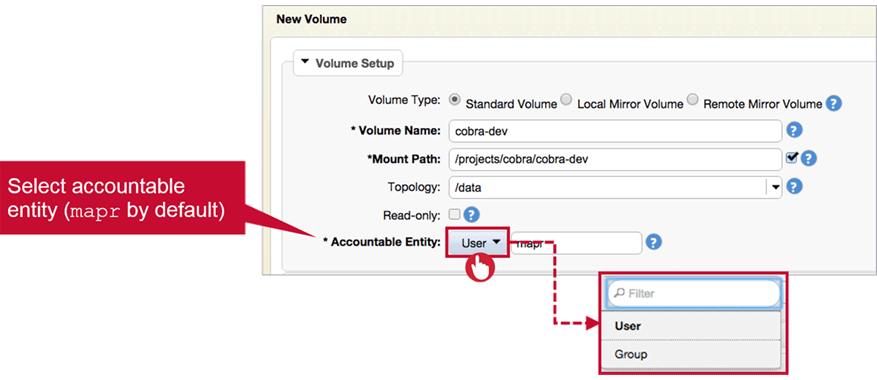
Accountable Entity
Select Accountable Entity by selecting an User/Group from drop-down list.
Volume Settings
-
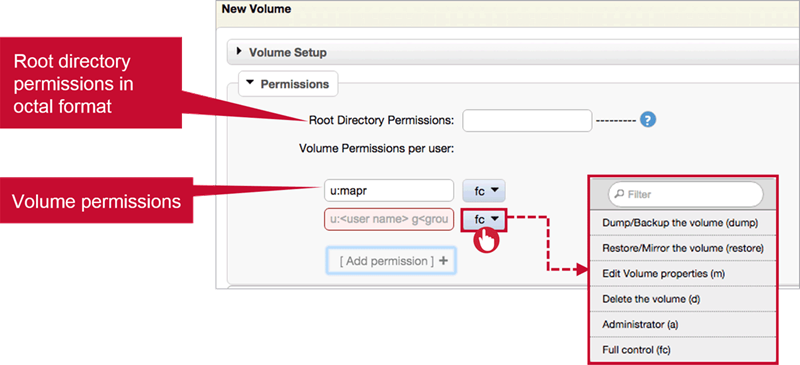
Permissions
- Quotas
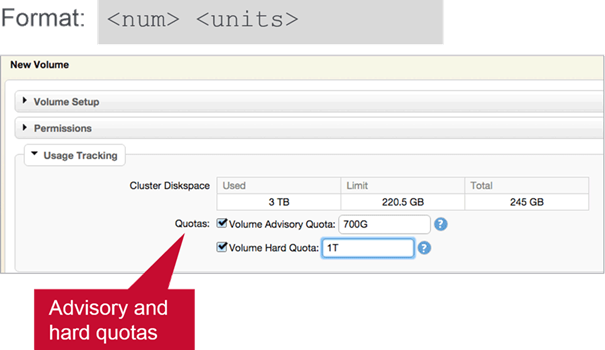
<units>is:M(Megabytes)G(Gigabytes)T(Terabytes)
-
Replication
-
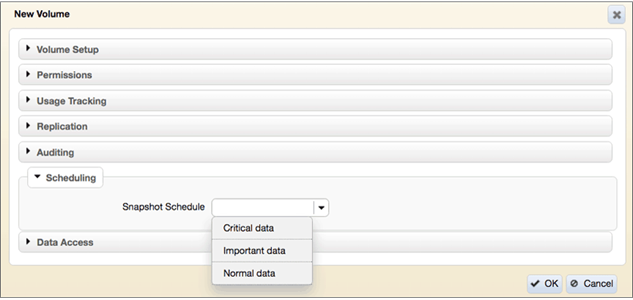
Scheduling
- Data Access
- Create Access Control Expressions to define access to volume data
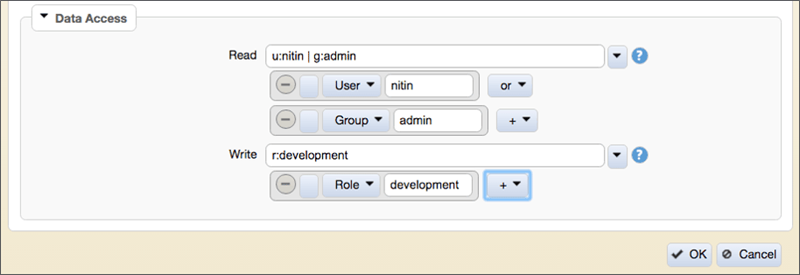
- Create Access Control Expressions to define access to volume data
Create Volumes with CLI
- Syntax
Create a volume and mount it with:
maprcli volume create -name <name> -mount 1 -path <path>Type the command with no options to see syntax:
maprcli volume create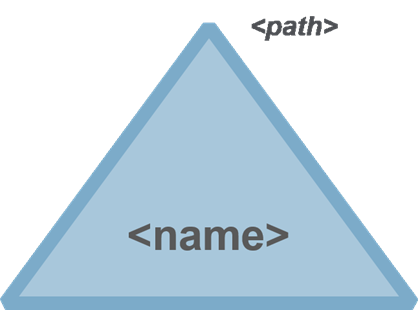
-
Options
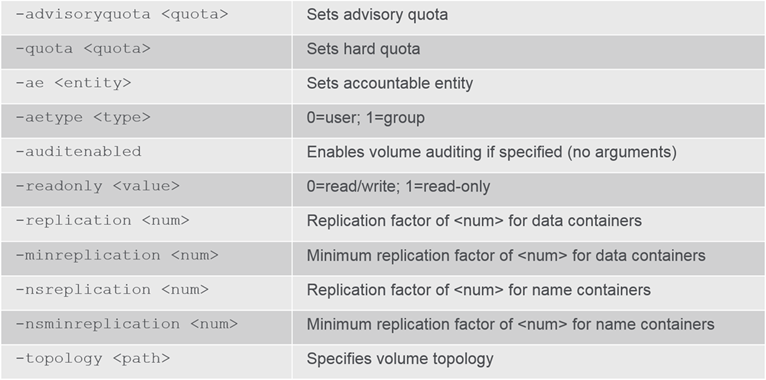 For a full list: Visit MapR Documentation
 - Set Permissions

Modify a Volume
-
MCS : Click a volume name to modify its properties

-
With maprcli:
maprcli volume modify -name <name> [options]
Job Logs and Scheduling
Configure Logging Options
Job and Application Log Options
Logs created by application in the cluster are by default are stored in local files. When Centralised logging is selected logs are written to local volumes on MapR-FS , you can then run a command that will create directory with links to all relevant logs. Yarn Log Aggregator will aggregate resource container logs from local filesystem and store into the cluster.
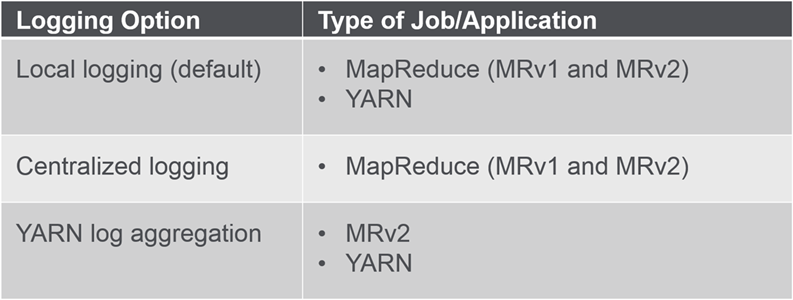
About Log Options
- Best practice: store logs on the MapR-FS
- Prevent failures due to lack of space on the local file system
- Access logs from one location
- Option: Configure centralized logging and YARN log aggregation
- If only centralized logging is configured, YARN jobs will use local logging
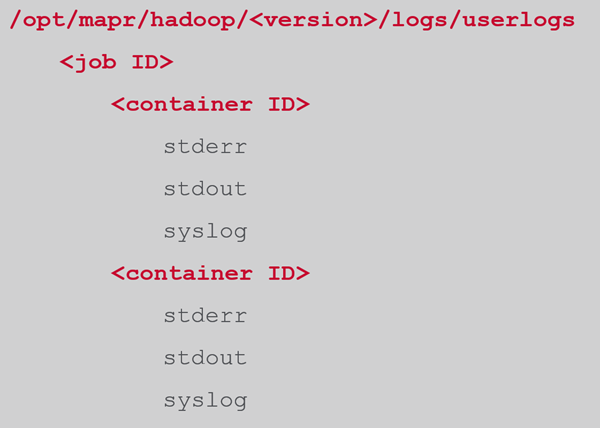
Local Logging
- Default
userlogshas one subdirectory per job ID<job ID>has one subdirectory for each container ID the job used<container ID>hasstderr,stdout, andsyslogfiles
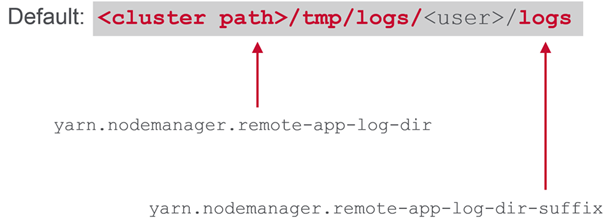
- Log Directory Location
- To set base directory for storing logs, set:
yarn.nodemanager.log-dirsinyarn-site.xml
- To set base directory for storing logs, set:
Centralized Logging
- Overview

- MapR-specific
- Only for MapReduce jobs
- Log files written to local volume on MapR-FS
- default:
/var/mapr/local//logs/yarn/userlogs - replication factor = 1
- I/O confined to node
- default:
- Details
- During or after a job, use:
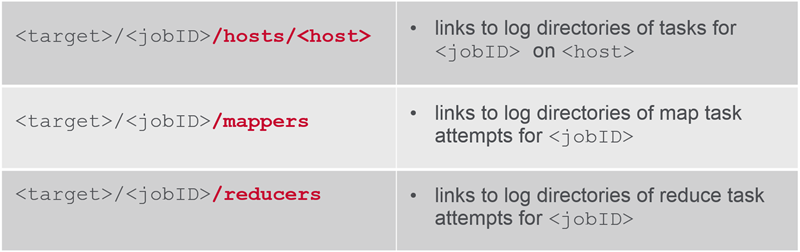
maprcli job linklogs -jobid <job> -todir <target-dir> <target-dir>- contains symbolic links to all related log files instead of copying files
- has sub-directories for hosts, mappers, and reducers
- During or after a job, use:
-
Output
- Configuration
- Configure in:
/opt/mapr/hadoop/<version>/etc/hadoop/yarn-site.xml
- Restart ResourceManagers if enabled while apps are running
- Configure in:
- Log Retention Time
- Configure in:
/opt/mapr/hadoop/<version>/etc/hadoop/yarn-site.xml
- Set retention time, in seconds.
- defaults to 30 days
- Configure in:
- View Logs in MCS
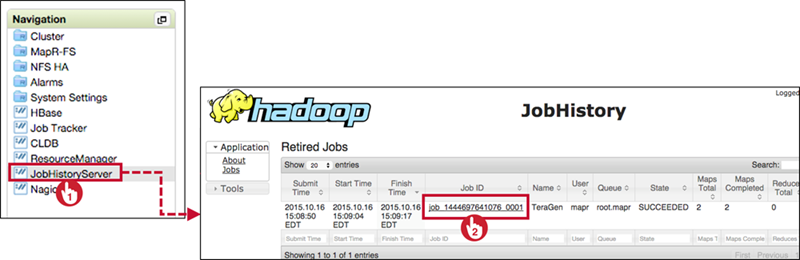
- Navigate to JobHistoryServer, click on job ID
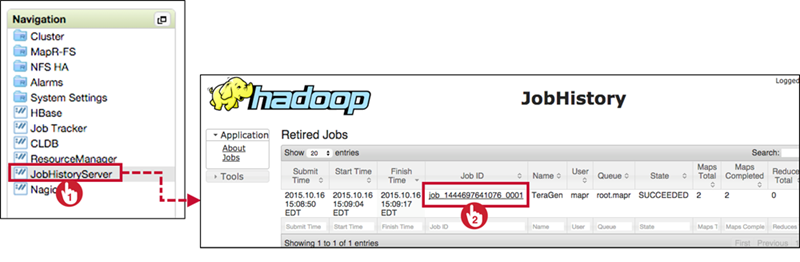
- Navigate to JobHistoryServer, click on job ID
- View Logs with CLI
maprcli job linklogs -jobid <job> -todir <target-dir>- After linking,
<target-dir>contains symbolic links organized by hostname and resource container ID - View logs with:
hadoop fs –cathadoop fs -tail
- After linking,
YARN Log Aggregation
Overview
![]()
- Aggregates and moves logs onto the MapR file system
- Accessed via:
- YARN command-line tools
- The HistoryServer UI
- The file system (with NFS)
- Logs owned by user who runs the application
Enabling
- Configure in:
/opt/mapr/hadoop/<version>/etc/hadoop/yarn-site.xml

- Also uses
yarn.log-aggregation.retain-seconds- same as for centralized logging
Log Locations
Configuration Steps

- Set
yarn.log-aggregation-enableproperty totrueon all NodeManager nodes - Set other properties if desired
- Restart the NodeManager services
- Restart JobHistoryServer
- to view aggregated logs through JobHistoryServer page
View Logs Through MCS
- Navigate to JobHistoryServer, click on job ID
View Logs Using CLI
- Determine application ID:
$ yarn application -list appStates FINISHED - View logs for the application:
$ yarn logs -applicationID <ID>
View Other Users’ Logs
<yarn logs path>/<user>/<log dir suffix>
- Default: yarn logs command searches current
userpath - To see logs for jobs submitted by another user:
$ yarn logs -applicationID <ID> -appOwner <user>
Configure the Fair Scheduler
Job Schedulers

- Used to prioritize jobs
- Fair Scheduler is the MapR default
- Others available:
- FIFO queue-based scheduler
- Capacity Scheduler
- Label-based scheduling
- add-on to capacity or fair scheduler
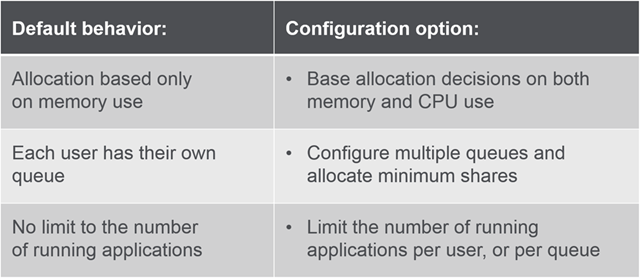
Fair Scheduler
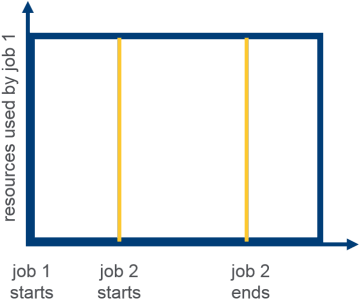
Overview
Dynamically allocates equal share of resources over time
Behavior
Can be configured in: /opt/mapr/hadoop/<version>/etc/hadoop/yarn-site.xml
Illustration
Here is an Illustration on Fair Scheduler
The Allocation File
Overview

- Modify on the ResourceManager node
- Configure Fair Scheduler policy defaults
- Configure queues and their properties
/opt/mapr/hadoop/hadoop-<version>/etc/hadoop/fair-scheduler.xml- Allocation is created during installation and reloaded every 10 seconds; so changes can be made dynamically.They are in XML format
Defining Queues
Queues are defined in a queue block.
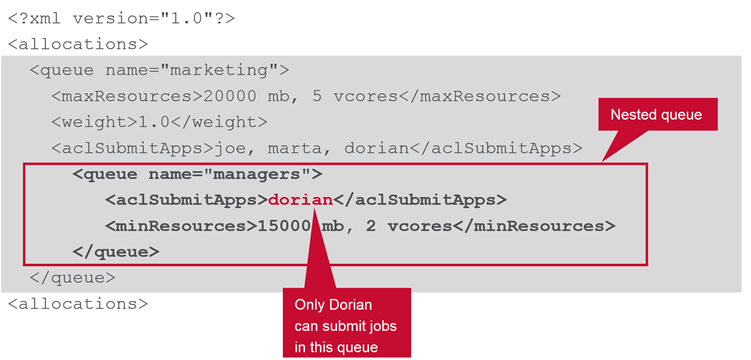
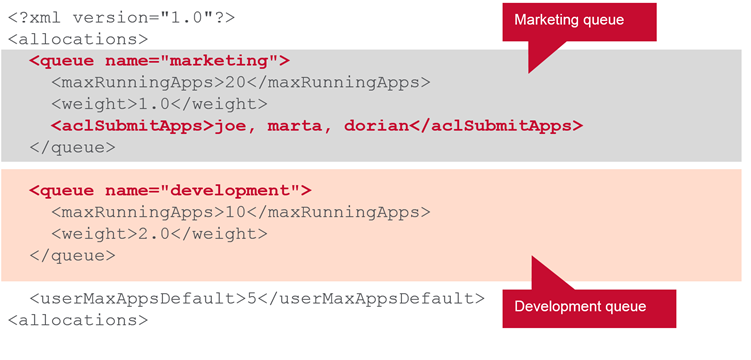 This is means only those users
 joe,marta and dorian can use marketing queue.
Queue Weights
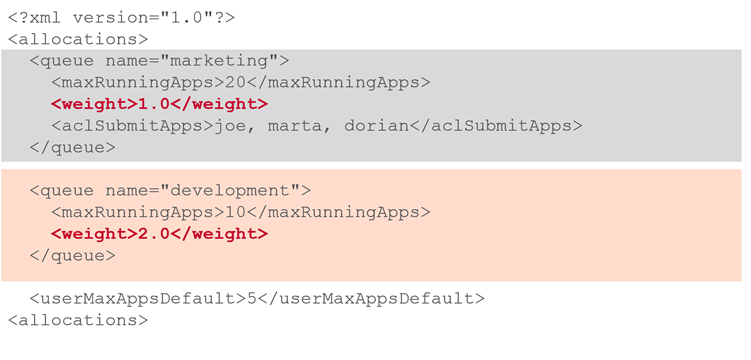 This means at full capacity
 development will use twice more resources than marketing.
Global Parameters
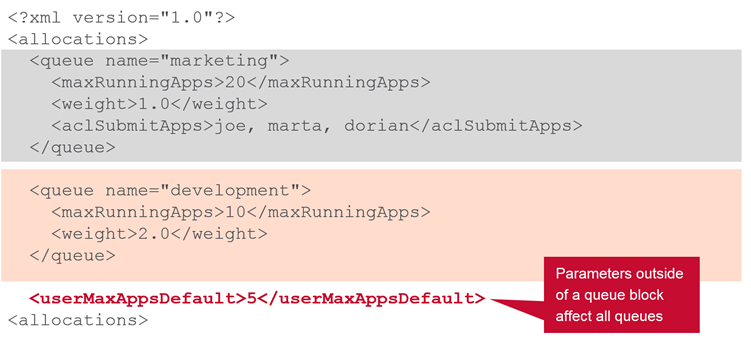 These can be overwritten for specific users…
Nested Queues
Resource Allocation
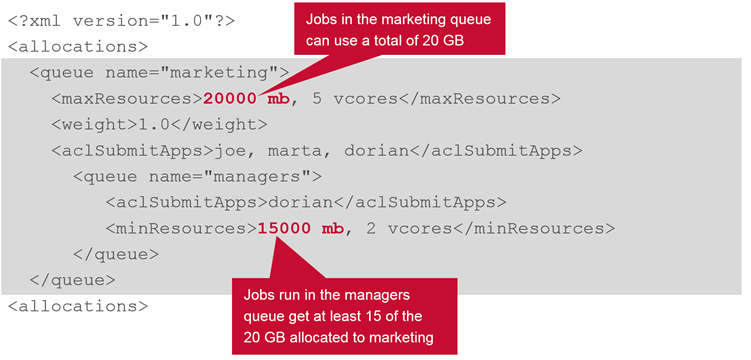 Memory allocation is not additive , so manager get 15Gb while other users in marketing queue get only 5Gb memory for their current jobs.
Leave a Comment